Introduction
In this article I will explain in detail how to setup SQLite with EntityFramework. Setting up SQLite and EntityFramework is straight forward but when I tried, it turn out that the version available at the time when this article was written is not really straight forward. So I thought of sharing this in the form of an article. In this article we will see how we could setup a Database First Entity model with SQLite with just a simple table. In this article we will also move the SQLite and EntityFramwork into a separate dll unlike other sample applications. This is to address another scenario which we will see later in this article.
For this article we will be using
- Visual Studio 2012
- SQLite 3
- EntityFramework 6
- .Net framework 4.5
Building the application.
Here in this example we will be having a single visual studio solution with two projects which targets .net framework version 4.5. To start with let us create an application and name it as StockWatch and the framework version should be 4.5. The main application could be any project type. This will be our main project. In my case I have created a WPF project. Now let us create a ClassLibrary project and name it as DataService and the .net framework should be 4.5. This is the project where we will be handling everything related to SQLite and EntityFramework. The main project will just remain as a dumb project which will refer to the DataService project and will fire a call to this project. This is not necessary to get everything up and running but this is to show one scenario while using SQLite which we will find towards the end of this article.
SQLite is a third party database and there is no inbuilt driver (ADO.Net provider) in .net framework to connect to this database. To connect to the SQLite database, we need an ADO.Net provider (driver) and this is provided by the SQLite website and can be found as a nugget package. System.Data.SQLite is an ADO.NET provider for SQLite. We need it in our project to proceed with SQLite. The name of the nugget package is also System.Data.SQLite. When we install this package, it will also install EntityFramework. This package comes as a complete package for getting everything done with EntityFramework and SQLIte. So let us install this first into our DataService project.

The prior requirement for this article is that we need an SQLite3 database with a simple table having two fields (id and name). We will now create an EntityFramework model out of this existing database. Currently EntityFramework supports ModelFirst approach but it is expected that they are going to drop ModelFirst approach going forward and we will not find this in EntityFramework7. Moreover SQLite provider for EntityFramework6 (System.Data.SQLite.EF6) does not support creation of table (such feature is not supported till date). So we cannot implement ModelFirst approach with EntityFramework when the database is SQLite. So here we will only address DatabaseFirst approach.
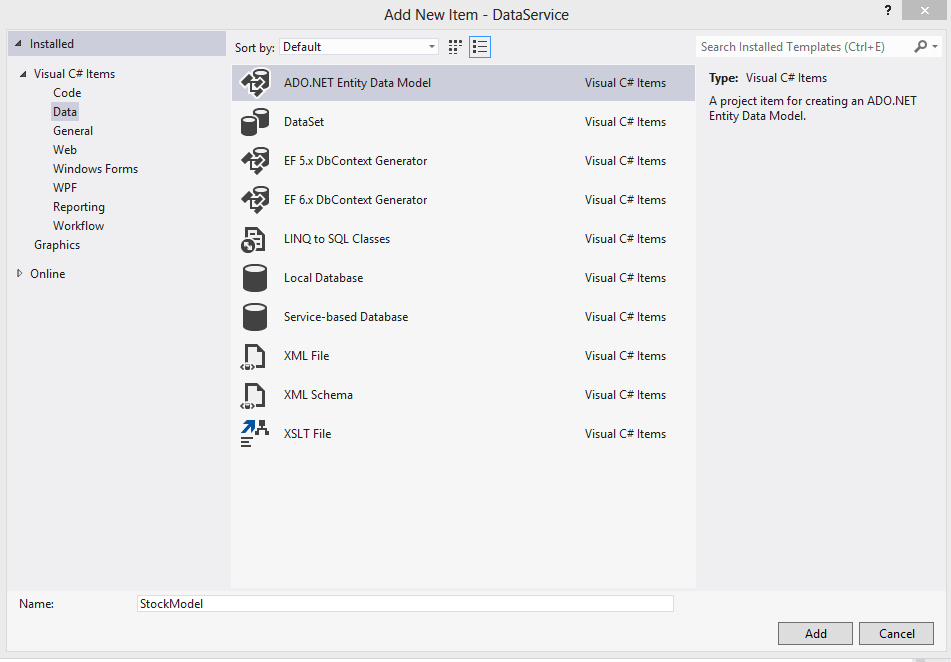
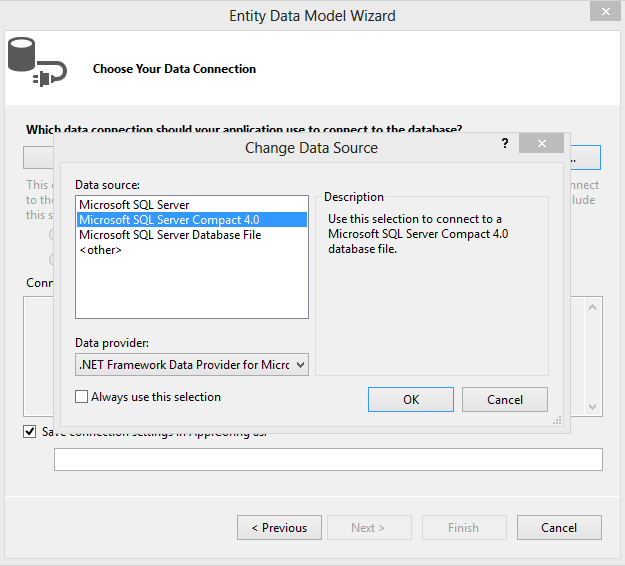
We will now create a model out of this existing database. To do this, create a new “ADO.Net Entity Data Model” item to the DataService project and name it as “StockModel” and proceed. From the “Choose Model Contents” dialog which pops up, select “EF Designer from database” and proceed. Now on the “Choose Your Data Connection” dialog which pops up, click on the “New Connection” button which pops up another “Connection Properties window”. On the “Data source” section click on “Change” button which will open up another dialog to Change Data Source as shown below.

Here we are missing the SQLite Data source in the dropdown. If you can see an entry for SQlite, then you already have everything ready in your machine and you can skip this step. Now if you are also like me, then we need to install an SQLite component for VisualStudio to have it list here. To get this component we have to go to the SQLIte site(https://system.data.sqlite.org/index.html/doc/trunk/www/downloads.wiki) and download the appropriate package for the version of visualstudio which we use. In my case I am using VisualStudio 2012 so I will download a package for VisualStudio 2012 as shown in the image below. Also the version of the package should be same as the version of the SQLite nugget package (See Issue 3 at the bottom of this article)

Now install this after downloading. While installing don’t forget to mark the option to install SQLIte component to GAC and to install the designer component for visualstudio. Once installed, please restart your machine. Once done, come back to the step where we were about to change the data source, now you can see SQLite component listed in the list and Select it and proceed.
Now it will show another dialog asking you to select your data base, here you browse and find the database which you have created. Now when you say OK to this dialog, it will create a model out of your database.
Issue 1
You may get some error at this point like “Unable to determine the provider name for provider factory of type 'System.Data.SQLite.SQLiteFactory'. Make sure that the ADO.NET provider is installed or registered in the application config.”
This is a bug in SQLite provider. Install SQLite nugget package into the project after changing the framework version to 4.0 and later change it to whatever .net framework which you desired. This will be a one time activity and later if you wish to add this package from project which targets 4.5, then also it will work.
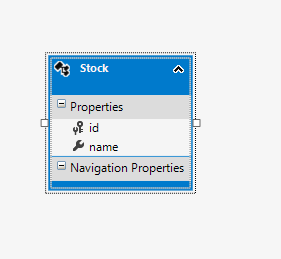
Now once you have fixed all issues, and when you create a model, you will get the model diagram as shown above. Now we will try to add some stock into the database using EntityFramework. For this we will create a class file in DataService project as shown below.
public class StockService
{
   private StockTradeEntities conn;
   public StockService()
  {
    conn = new StockTradeEntities();
  }

  public void AddStock(string stockCode)
  {
    Stock st = new Stock();
    st.name = stockCode;
    conn.Stocks.Add(st);
    conn.SaveChanges();
  }
}
Now refer this project from the main application and fire the method AddStock(). This will add the stock item into database. Here when you try to run the application and when you fire the AddStock method, you will get an error as below.
Issue 2
The Entity Framework provider type 'System.Data.Entity.SqlServer.SqlProviderServices, EntityFramework.SqlServer' registered in the application config file for the ADO.NET provider with invariant name 'System.Data.SqlClient' could not be loaded. Make sure that the assembly-qualified name is used and that the assembly is available to the running application.
Now here all of our SQLite setting is added to the app.config file of our main application and it is expected that SQLite dlls must be present in the output folder where we have the app.config file. We could add the nugget package reference to the main application to fix this, but this breaks the convention of a standard application because for an enterprise application, we would expect that functionalities should be moved as separate modules for better maintenance and adding reference to components used in another module to main application doesn’t look nice or it doesn’t make sense. Here what we could do is that we will change the output directory of the DataService project to point to the same output directory of your main application. This way all the dlls referred by your SQLite module project will be available in the same folder where you have your application config file. This way you could fix this issue.
Issue 3
Cannot find the SQLite Data source in visual studio data source list even after installing SQLite component for Visualstudio.
Here if you are getting this issue, then please make sure that you have added the SQLite nugget package to the project where you are trying to create a model. This step is necessary to have it listed in the visual studio list of data sources. When you add the nugget package, it adds certain entries to the app.config. These entries are necessary for visual studio to list the component in the data source list.
Now this is all about setting up EntityFramework and SQLite. Now you can build more functionality on top of this. :)