Tuesday 20 October 2015

Introduction

    Starting with IIS 7, we can have IIS hosting application which can run on separate App-domain. Running application on separate App-domain is required when we need application to work in isolation i.e. to prevent applications in one application pool from affecting applications in another application pool on the server. An application can have several virtual directories, and each one will be served by the same App-domain as the application to which they belong. In most of the cases it should be fine to run an application in the default app-domain created by IIS. But on special scenarios say for example, if you want your application to be served by a different version of the run-time, then you can create an app-domain by specifying the run-time version and can use that to serve the application. Or if you want your applications to work in complete isolation then also you can do the same. Here in this post we will see how to host multiple WCF service under one website where each service is running in isolation with each on separate app-domain.

Hosting WCF service using separate app-domain.

  An application is an object important to the server at run-time. Every website object in IIS must have an application and every application must have at least one virtual directory where each virtual directory points to a physical directory path. When you create a website object in IIS, you are creating a default application. An application can have several virtual directories. To know how you can host a WCF service in default application in IIS, you can refer to the article [Article] How to host a WCF service in IIS 8. Let us now examine how we have created a website object with default application.


  Here in the IIS, in connections section, on Sites, when we right click and say “Add website” it opens up a website object(default application) creation wizard like as shown in the image above. Here “Site name” refers to the name of the site(application) which you want. “Physical directory” should point to the root directory of the website. Just for the demo purpose we will point the physical directory to an empty folder. It could also be a root folder of one WCF service where you have the .svc file. And in the section where it is asking for the “Application pool” is where we have to select the application pool or so called app-domain. Here at the moment we only have a default app domain so we will leave it as is. And if you say ok, then the website object is ready. Now what we have done here is we have created a website object, we have created a default application, we have created a virtual directory which will point to the physical directory as specified in “Physical directory” and the default application will now run in an app domain specified by us in the “Application pool” section. Now we will see how we can create another app-domain.

Creating Application Pool(App-domain)

In IIS, on the connection section, if you expand the server node, you can see “Application Pool” node. On the “Application Pools” node if you right-click and say “Add Application Pool” it will open up a window as shown below. Give a name for your new app-domain, this could be any unique name. and select the version of run-time which you like the application to run with and say Ok. Now your new app-domain is ready to use. 


Adding new application object

  Now on to the website object which we just created, right click and say Add Application, it opens up a wizard to create an application object under the website object. Now in this wizard, Alias is the name which we are going to give to the application and this name is also going to be the part of the url of the application so give it a proper name. The Physical Path is where your root folder for your wcf service where you have the .svc file. Now the Application pool section is where you can select your App-domain which you created just before.


Now when you browse the .svc file from the application folder, IIS will then use the App-domain which you have assigned for the application to serve the request. In this way you can create more app domain and more WCF services which will then work in isolation.


Introduction

    In this post we will see how we can identify if the application has been maximized or it is restored to normal state. We will use the Resize event equivalent in WPF which is SizeChanged event. We will subscribe to this event and will check the window state to identify if the window has been maximized or it is restored to normal.
Application.Current.MainWindow.SizeChanged += WindowSizeChanged;
private void WindowSizeChanged(object sender, SizeChangedEventArgs e)
{
    this.HandleWindowState();
}
 
private void HandleWindowState()
{
    WindowState windowState = Application.Current.MainWindow.WindowState;
    if (windowState == WindowState.Maximized)
     {                    
     }
    else if (windowState == WindowState.Normal)
     {                    
     }            
}
And let’s not forget to clean it by unsubscribing to the SizeChanged event by
Application.Current.MainWindow.SizeChanged -= WindowSizeChanged;

Saturday 17 October 2015

 Introduction

  Here in this article we will see how to configure and host a WCF service in IIS 8. When we want to expose our service to internet, hosting it in IIS is the easy and effective way to do it. When you host it in IIS, it comes with all the added advantage of the web server. If you don’t want to host in IIS, you could still do that with a console application running in a server machine. To know more on hosting a service in console application and exposing an http endpoint, you can refer to [Article] How to host a WCF service in console application using wsHttp binding. The entire configuration which you will see in this article will be for Windows 8 and Visual studio 2012.

  1. Configure IIS
  2. Create a WCF service.
  3. Hosting in IIS

1. Configure IIS

  • Enable IIS – Internet information service (IIS) will be disabled by default in windows 8. We need to enable this as a first step in hosting wcf. To do this you have to go to Control Panel -> Programs and Features and select Turn windows features on or off from the left side menu and enable IIS.


  • Enable Asp.Net – The runtime which is going to serve your wcf service when you host it in IIS is the ASP.Net. By default this is disabled in IIS, we have to enable this. Without ASP.Net IIS will not be able to serve your WCF service. To enable ASP.Net you have to go to Control Panel -> Programs and Features and select Turn windows features on or off and under Internet Information Service->World Wide Web service->Application Development Features select the ASP.Net version which you want.


  • Enable WCF and its HTTP endpoint feature – We have to enable WCF and the WCF HTTP Activation feature in IIS. Without this IIS won’t be able to recognize the WCF service and it won’t be able to serve it. To enable this, go to Control Panel -> Programs and Features and select Turn windows features on or off and select .Net Framework 4.5 Advanced Services and enable WCF Services and HTTP Activation under WCF.


With this our basic features in IIS to host a WCF service is enabled. Now restart IIS and we should be able to host the WCF service.

2. Create a WCF service

  Here to test hosting a WCF service, we will create simple WCF service. We will then host this WCF service to see it in action in IIS. To begin with, let’s create a service. Create a folder called Host_wcf. Inside this folder create another folder and name it as App_Code. To this folder, create a file called DataService.cs and copy paste the service code as given below.

using System;
using System.Collections.Generic;
using System.Linq;
using System.Text;
using System.Threading.Tasks;
namespace SqliteService
{
    using System.ServiceModel;
    [ServiceContract()]
    public interface IDataService
    {
        [OperationContract()]
        void AddCustomer();

        [OperationContract()]
        void AddProduct();
    }

    public class DataService : IDataService
    {
        public void AddCustomer()
        {
        }

        public void AddProduct()
        {
            throw new NotImplementedException();
        }
    }
}


Now create a file called services.svc in the root folder, i.e. to Host_wcf and add the below line of code into it.
<%@ServiceHost language=c# Debug="true" Service="SqliteService.DataService" CodeBehind="~/App_Code/DataService.cs" %>

Here CodeBehind points to the file where we have the service implementation. Now we need a Web.config file in the root folder i.e. at Host_wcf folder. Copy paste the below line of code into it. Here the configuration is a prebuild configuration, to know more on how to create this end point, go to [Article] How to host a WCF service in console application using wsHttp binding.

<?xml version="1.0" encoding="utf-8" ?>
<configuration>
  <system.serviceModel>
    <behaviors>
      <serviceBehaviors>
        <behavior name="MEX">
          <serviceMetadata httpGetEnabled="true" httpsGetEnabled="false" />
        </behavior>
      </serviceBehaviors>
    </behaviors>   
    <services>
      <service behaviorConfiguration="MEX" name="SqliteService.DataService">
        <endpoint address="Mex" binding="wsHttpBinding" bindingConfiguration=""
          name="Mex" contract="IMetadataExchange" kind="" endpointConfiguration="" />
        <endpoint address="IDataService" binding="wsHttpBinding" bindingConfiguration=""
          name="wsHttp" contract="SqliteService.IDataService" />
        <host>
          <baseAddresses>
            <add baseAddress="http://localhost:80" />
          </baseAddresses>
        </host>
      </service>
    </services>
  </system.serviceModel>
</configuration>

Now we need to set the permission for the root folder so that IIS can access content from this folder. Go to security settings of the root folder and give read and execute permission for “Everyone”. With this, we are ready with the service. When you host a service in IIS, it is the ASP.Net runtime which compiles the code behind and serve the service. So make sure that it is error free and it can compile properly. Alternatively you can create a WCF project using “WCF Service Application” project template in visual studio and compile the code to make sure that it can compile properly.


3. Hosting in IIS

Now we will see how we can host a service in IIS. Let us launch IIS. To do this type “inetmgr” in Run, it will open up the Internet Information Service (IIS) Manager. Now expand the server from left hand side under Connection section. Now expand Sites. Here we will have a default website running, the default website will be using port no 80. We are also going to host the service on port 80 which is the default http port. We cannot have two websites using same port. So we will stop the default website for time being. To do this, right click on the Default Web Site and from Manage WebSite say stop. Now right click on the Sites and say Add Website and fill in the details as shown in the image below. We can also host our service as an application under the default website but let’s do it this way.


Now here the physical path is the path to our root directory which we created to hold the wcf service files. Say OK and your service should be ready to use now. Now to confirm this, we will browse the .svc file in our service.


If everything is fine, it should pop up a page which looks something like as shown in the image below.


Monday 12 October 2015

Introduction

    In this article we will see how to host a wcf service using the wsHttpBinding. When you use http, you would normally host it in IIS, but if you would like to host it in a console application, you could follow this article. Here we will try to host a service with a wsHttpBinding and will expose a MEX endpoint in order to expose the metadata so that any tool which can generate a proxy can use it. Here in this example we are exposing the MEX endpoint particularly to be used in the WCF test client. This article will not cover how you can generate a wcf service. If you like to know how a basic service is created, you need to read [Article] Creating WCF Service and Self Hosting in a console application.

How to edit wcf configuration.

All your wcf configuration will be stored in the app.conf file of your host project. Here in our case as we are going to host it in a console application, it will be the app.conf of the console application. You could use the wcf configuration edit tool to edit this configuration. To open the wcf configuration tool, do as shown in the image.


Adding an endpoint with wsHttpBinding

Here we need to add an wshttp endpoint. Create your endpoint as shown in the image below.


Here in the address field, give the name of the interface where you have defined a service contract. Here the address name could be anything but we will keep it as the name of the interface, this is the relative address which we are defining; we will later add a base address for this. Add wsHttpBinding on to the binding column. Here we defined wsHttp as the binding for this endpoint. To the contract field, browse to the dll where we have the interface on which we have defined the service contract. You could point to the dll where we have this interface. 

Adding a base address for the endpoint.

Now we need to add a base address to the service, So that the complete address for the service will look like “Base Adress + Name of the service” Add it as shown in the image. Here the port number can be any port number except the reserved and already used.


With this, we are done creating a basic endpoint.

Adding MEX Endpoint.

Now create a wsHttp MEX endpoint as shown in the image. Here IMetadataExchange is the default contract implementation from Microsoft. We will just add this text as the contract implementation of MEX. 


Now this is a MEX end point exposed via http, so we need to enable some more setting for this MEX end point to work. Go to advanced->Service Behavior->MEX and set HttpGetEnabled to true as shown in the image below.


Adding Mex behaviour to the service.

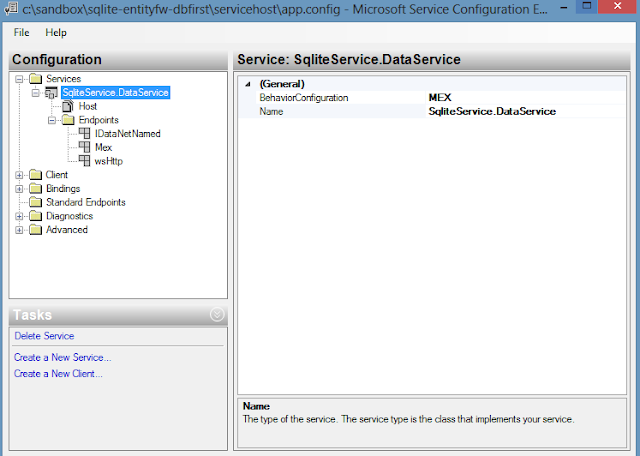
Now we need to enable MEX behaviour to the service. Do as shown in the image. Select MEX from the dropdown for BehaviorConfiguration. Remember, MEX is the name given to the Mex endpoint.


Now we are ready, now remember to run the service host as Admin, because when we have http endpoint, it requires this or else it will throw an access violation exception. Now open the WCF test client and add the service endpoint to test it.


Tuesday 6 October 2015

Introduction

    There are scenarios where we have to show a standalone message box even before the application main window is launched. In such scenario, we need to do something different. Say if we have a composite application with a bootstrapper, and we want to show some error while running a bootstrapper, it may look difficult because we don’t have a parent window. In such scenario, we can show the message box as shown below.

private static void ShowError(string message)
        {
            
/* We cannot show a message out in void. So we are creating a dummy window and setting visibility as hidden. we will then use this as the parent of the message box. */

            var w = new Window() { Height = 0, Width = 0, Visibility = Visibility.Hidden, WindowStyle = WindowStyle.None };

            w.Show();
            System.Windows.MessageBox.Show(w, message);
            w.Close();
        }

Here we will create and show a window where the visibility of the window is set to hidden, now we will use this window as the parent of the message box and will show the message box.

Wednesday 30 September 2015

Introduction

      This post is a continuation of [Article] WPF Wizard control with MVVM support. Here I am trying to address some of the concerns people have regarding wizard control. This include
1. How to share/collect data from each view.
2. How to control the navigation or how to validate before navigation.

To know more on the basics, please refer to the parent article. Here I have modified the wizard control files. The wizard comes with three files.

This control comes in three files.

1. Wizard.cs
2. WizardItemHeader.cs
3. IWizardItem.cs

You can download this control from Github page. Contribution to this control will be appreciated.


public interface IWizardItem
    {
        /// <summary>
        /// This method should return the header for wizard item to display
        /// </summary>
        /// <returns> A string value.</returns>
        string GetHeader();

        /// <summary>
        /// This method will be the first to get invoked even before the OnViewActivated call. This method will pass a shard object to views in wizard where they can collect the shared object.
        /// </summary>
        /// <param name="sharedObject">
        /// This is the shared object. This will contain information from other views in the wizard.
        /// </param>

        void CollectSharedObject(object sharedObject);

        /// <summary>
        /// This method will be invoked to check whether this item can be displayed or not.
        /// </summary>
        /// <returns>A boolean value indicating true or false status</returns>

        bool CanDisplay();

        /// <summary>
        /// This method will get invoked when the wizard item becomes the active item.
        /// </summary>
        /// <param name="autoAcknoledgeNext">
        /// The auto Acknoledge Next. Setting this to true will help wizard skip this view and take you to the next page automatically.
        /// </param>

        void OnWizardItemNavigatedTo(ref bool autoAcknoledgeNext);

        /// <summary>
        /// This method will get invoked on the current wizard item when the control is moved to next wizard item.
        /// </summary>
        /// <param name="canNavigateAway">
        /// The can Navigate Away. This value when set to false, will not allow navigation from this view. You can use this to do some validation before you navigate to next view.
        /// </param>

        void OnWizardItemNavigatedFrom(ref bool canNavigateAway);
    }

IWizardItem is the interface which you need to implement on the viewmodel for the view which you will show in the wizard. Here wizard also exposes a property called “SharedObject” this can be of any type which. The wizard will then pass it to the viewmodel of the view currently displayed. So the viewmodel can collect it and save data on to this and can be used at later stage.

Now you can use this wizard in wpf as shown below.
<wizardView:Wizard CancelCommand="{Binding CancelCommand}"
      OkCommand="{Binding OkCommand}"
      SharedObject="{Binding SharedObject}"       
      Orientation="Top"
      FinalButtonText="Done"
      WizardItems="{Binding WizardItems}" />

You can download the sample code from Here.


Tuesday 22 September 2015

Introduction

 In this article we will see how to call a WCF service without adding a service reference. In this article we will see two ways of calling WCF service method. One is to call the WCF service method on the fly and second is by creating a custom proxy without the help of SvcUtil or any other tool. We will be using a two way service in this article.

Introduction

 There are cases when an operation has no return value, and the client does not care about the success or failure of the invocation. To support this sort of fire and forget invocation, WCF offers one-way operations. In this article we will see how to create a one way service which responds to client via callback.

Monday 8 June 2015

Introduction

         In this article we will see how we can cancel a running task. Task class in .net library is extremely useful when you want to handle thread. Developers don’t have to create or maintain thread explicitly. Methods executed by a Task typically execute asynchronously and it uses background threads from the thread pool. There is no direct way of cancelling a task. .Net framework provides CancellationToken  which we can use to cancel a task with limitation. We will first look at how to cancel a task with cancellation token and later we will see in which all scenario this doesn't work and we will also see the workaround for this.

Cancelling a task using CancellationToken

You can register an action to execute when a cancel is invoked on a cancellation token, To cancel a task we have to hook the thread on which the task executes the method and we have to call abort on that thread to stop the thread and there by cancelling the task as shown below.
int DoWork(CancellationToken token)
{
  Thread t = Thread.CurrentThread;
  using (token.Register(t.Abort))
  {
    // CPU-bound work here
  }
}

You can find the complete code below. Here we have a generic method called ExecuteAsync which can execute any given method. Here TReturn is the type which we return from the method which we want to execute.

namespace ConsoleApplicationTest
{
    using System;
    using System.Threading;
    using System.Threading.Tasks;

    public class AsyncTaskResult<TResult>
    {
        public TResult Result { get; set; }

        public Exception Exception { get; set; }
    }

    class Program
    {
        static void Main(string[] args)
        {
            Console.WriteLine("Press any key to proceed!");
            Console.ReadLine();

            var canceller = new CancellationTokenSource();
            Action<AsyncTaskResult<bool>> act = (o) =>
            {
                // you will get the result as a callback here.
                bool result = o.Result;
                Exception exception = o.Exception;
            };
            ExecuteAsync(DoWork, act, canceller, null);
            Thread.Sleep(2000); // cancel the task after 2 seconds.
            canceller.Cancel();

            Console.WriteLine("Press any key Exit!");
            Console.ReadLine();
        }

        private static bool DoWork(object parameter)
        {
            try
            {
                // make it sleep for 60 seconds.
                Thread.Sleep(1000 * 60);
            }
            catch (ThreadAbortException ex)
            {
                /* Do all the cleanup required. 
                 This is very important as this is the only chance to cleanup resources used by the task.
                 */
            }

            return true;
        }

        private static void ExecuteAsync<TReturn>(Func<object, TReturn> action, Action<AsyncTaskResult<TReturn>> callback, CancellationTokenSource canceller, object parameter)
        {
            Exception thrownException = null;
            TReturn returnValue = default(TReturn);

            Func<object, TReturn> work = o =>
            {
                Thread currentThread = Thread.CurrentThread;

                /* register abort as the action for cancellation tocken. This method will be invoked when we call cancell on cancellation tocken */
                using (canceller.Token.Register(
                    () =>
                    {
                        try
                        {
                            currentThread.Abort();
                        }
                        catch (Exception)
                        {
                            // silence it. Cancelable operations and callbacks registered with the token should not throw exceptions.
                        }
                    }))
                {
                    return action(parameter);
                }
            };

            Task<TReturn> startNew = Task.Factory.StartNew(work, null, canceller.Token);

            startNew.ContinueWith(
                t =>
                {
                    try
                    {
                        AggregateException aggregateException = t.Exception;
                        if (aggregateException != null)
                        {
                            if (null != aggregateException.InnerException)
                            {
                                thrownException = aggregateException.InnerException;
                            }
                            else
                            {
                                thrownException = aggregateException;
                            }
                        }
                        else
                        {
                            returnValue = t.Result;
                        }
                    }
                    catch (Exception)
                    {
                        // silence it.
                    }
                    finally
                    {
                        var ret = new AsyncTaskResult<TReturn>
                        {
                            Result = returnValue,
                            Exception = thrownException
                        };

                        callback.Invoke(ret);
                    }
                });
        }
    }
}

Problem using this way of cancelling a task.

  1. Calling an abort on a thread will not guarantee an abort. If there is any blocking call, say for example, if the method is waiting for a call-back from a socket communication, then calling an abort on that thread won’t stop the thread from execution. So even if you try to call a cancel on a cancellation token, it will have no effect on the thread.
  2. Aborting a thread is not a recommended way of stopping a thread. It will leave the app domain in an unsafe state.

How to cancel a blocking task?

We will have to rely on abort in this situation as-well but in a different way. Here, to achieve this, we will have to deploy another task! This sounds like a weird way of solving this? We don’t want a failing cancel call!. Here we will deploy another task and the abort will be called on that. The complete code on how to cancel a blocking task can be found below.

namespace ConsoleApplicationTest
{
    using System;
    using System.Runtime.CompilerServices;
    using System.Threading;
    using System.Threading.Tasks;

    /// <summary>
    /// Wrapper class which is used to wrap the result and exception from the task.
    /// </summary>
    /// <typeparam name="TResult"></typeparam>
    public class AsyncTaskResult<TResult>
    {
        public TResult Result { get; set; }

        public Exception Exception { get; set; }
    }

    class Program
    {
        static void Main(string[] args)
        {
            Console.WriteLine("Press any key to proceed!");
            Console.ReadLine();

            var canceller = new CancellationTokenSource();
            Action<AsyncTaskResult<bool>> act = (o) =>
            {
                // you will get the result as a callback here.
                bool result = o.Result;
                Exception exception = o.Exception;
            };
            ExecuteAsync(DoWork, act, canceller, null);
            Thread.Sleep(2000); // cancel the task after 2 seconds.
            canceller.Cancel();

            Console.WriteLine("Press any key Exit!");
            Console.ReadLine();
        }

        private static bool DoWork(object parameter)
        {
            try
            {
                // make it sleep for 60 seconds.
                Thread.Sleep(1000 * 60);
            }
            catch (ThreadAbortException ex)
            {
                /* Do all the cleanup required. 
                 This is very important as this is the only chance to cleanup resources used by the task.
                 */
            }

            return true;
        }

        private static void ExecuteAsync<TReturn>(
            Func<object, TReturn> action,
            Action<AsyncTaskResult<TReturn>> callback,
            CancellationTokenSource canceller,
            object parameter)
        {
            Exception thrownException = null;
            TReturn returnValue = default(TReturn);

            Func<object, TReturn> work = o =>
            {
                bool cancelled = false;

                using (canceller.Token.Register(
                    () =>
                    {
                        // just mark cancelled as true when cancel is invoked on this task.
                        cancelled = true;
                    }))
                {
                    Func<object, TReturn> subWork = op =>
                    {
                        Thread currentThread = Thread.CurrentThread;
                        using (canceller.Token.Register(
                            () =>
                            {
                                try
                                {
                                    // mark abort as the action to execute when cancel is invoked for this task.
                                    currentThread.Abort();
                                }
                                catch (Exception)
                                {
                                    /* silence it. Cancelable operations and callbacks registered with the token should not throw exceptions.*/
                                }
                            }))
                        {
                            return action(parameter);
                        }
                    };

                    Task<TReturn> task = Task.Factory.StartNew(subWork, null, canceller.Token);
                    while (!task.IsCompleted && !cancelled)
                    {
                        /* we will wait for half a second to poll again. We could also reduce this timeout.*/
                        Thread.Sleep(500);
                    }

                    if (cancelled)
                    {
                        /* As we are releasing the thread to kill itself, we have to raise a thread abort exception explicitly.*/
                        throw new TaskCanceledException();
                    }

                    if (task.Exception != null)
                    {
                        /* throw the exception if any while executing the sub task.
                             * Task exception will be aggregate exception, we are here interested in the real exception, so pass the inner exception. 
                             * ExceptionDispatchInfo is a feature in .net 4.5. This lets you capture an exception and re-throw it without changing the stack-trace:
                            */
                            ExceptionDispatchInfo.Capture(task.Exception.InnerException).Throw();
                    }

                    // return the result if the task executed successfully.
                    return task.Result;
                }
            };

            Task<TReturn> startNew = Task.Factory.StartNew(work, null, canceller.Token);

            startNew.ContinueWith(
                t =>
                {
                    try
                    {
                        AggregateException aggregateException = t.Exception;
                        if (aggregateException != null)
                        {
                            // grab the exception thrown by the task if any.
                            if (null != aggregateException.InnerException)
                            {
//ExceptionDispatchInfo will help you capture the exception stack.
thrownException = ExceptionDispatchInfo.Capture(aggregateException.InnerException).SourceException;
                            }
                            else
                            {
                                thrownException = aggregateException;
                            }
                        }
                        else
                        {
                            returnValue = t.Result;
                        }
                    }
                    catch (Exception)
                    {
                        // silence it.
                    }
                    finally
                    {
                        /*wrap the exception and result into a single object to pass it back to caller.*/
                        var ret = new AsyncTaskResult<TReturn> { Result = returnValue, Exception = thrownException };

                        callback.Invoke(ret);
                    }
                });
        }
    }
}

Sunday 7 June 2015


Introduction

While I was working with WCF service application, I came across a situation where I am hosting my WCF service in a console application and I don't want the console application to show up when my service is up. I fixed it this by Pinvoke a call to FindWindow() to get a handle to your window and then call ShowWindow() to hide the window. I have created a sample code to show how I did this. It is as given below.

using System;
using System.Runtime.InteropServices;
using System.Threading;
namespace TestShowHideConsole
{
    internal class Program
    {
        [DllImport("user32.dll")]
        public static extern IntPtr FindWindow(string lpClassName, string lpWindowName);

        [DllImport("user32.dll")]
        private static extern bool ShowWindow(IntPtr hWnd, int nCmdShow);

        private static void Main(string[] args)
        {
            string consoleWindowTitle = Console.Title;
            IntPtr hWnd = FindWindow(null, consoleWindowTitle);
            if (hWnd != IntPtr.Zero)
            {
                ShowWindow(hWnd, 0); /* 0 = SW_HIDE */
            }
            Thread.Sleep(1000*10);/* will show your console after 10 second */
            if (hWnd != IntPtr.Zero)
            {
                ShowWindow(hWnd, 1); /*1 = SW_SHOWNORMA */
            }
            ConsoleKeyInfo consoleKeyInfo = Console.ReadKey();/* this will make the window wait till some key is pressed.*/
        }
    }
}

Here in this example, this will open up a console and it will be hidden for 10 seconds and will come up after that.

How to hide a console application If it is running from another application.

If you are running the console application from another application and you want to hide the console window, then you can do like this. This will start your console application but the window will be hidden. You can see your application still running from the task manager. If you cant find your application running in the task manager, then some error is there in your application and you may need to debug it

Process p = new Process
        {
          StartInfo =  {
                       FileName = YourConsoleaApplicationFileHere,
                       Arguments = "Argument to console application if                     any.",
                       WindowStyle = ProcessWindowStyle.Hidden
/*Or you can use CreateNoWindow = true instead of WindowStyle*/
                       }
         };
p.Start();


Introduction

This error can happen when you use Microsoft Team Foundation Server(TFS) and if you don’t have proper binding files. This can happen if the solution is new in TFS and there are no binding files associated with it. You can easily fix this. To fix it, you have to go to

File -> Sourcecontrol-> change source control.


Click on the project which don’t have binding and say bind. This will automatically bind your solution with the source control. Do the same for the entire project which don’t have proper binding.

ContractFilter mismatch at the EndpointDispatcher

A "ContractFilter mismatch at the EndpointDispatcher" can happen because the client could not process the message because no contract claimed it. This can happen because of the following reasons:

  1. Your client and the service have different contracts in between.
  2. Your client and service is using a different binding in between.
  3. Your client's and service's message security settings are not consistent in between.

Most of ContractFilter mismatch at the EndpointDispatcher bugs are because you use custom binding and your binding has extra tag which is missing either at client or service side. Have a close look at your binding, verify that it is same at both client and server side. The tags has to be same at client and server side, attribute value such as timeouts can vary at client and server. This is common and will not create issue. But if you have a tag say <ReliableSession /> at client side and is missing at server side, 'http://schemas.xmlsoap.org/ws/2005/02/rm/CreateSequence' cannot be processed at the receiver, due to a ContractFilter mismatch at the EndpointDispatcher can happen.


Introduction

This post is for those who are working with WCF and at times sulking because of errors which does not show up and who spends lots of time debugging what is going wrong with their service and client.

I was working with a WCF service and I came across a situation where my client application is trying to connect to service via proxy and client is waiting for the call to return and it never returns finally it times out. I was not having any clue what was happening. I had application level tracing which was not able to track anything. Finally I decided to  enable WCF built in tracing!.

How to enable WCF Trace listener

By default Windows Communication Foundation (WCF) does not log messages. To enable message logging, you must add a trace listener to the System.ServiceModel.MessageLogging trace source and set attributes for the <messagelogging> element in the configuration file. Lets see how to enable WCF logging.  You can use WCF provided Configuration Editor Tool (SvcConfigEditor.exe) to configure these settings..

Basic Setting

<system.diagnostics>
  <sources>
      <source name="System.ServiceModel.MessageLogging">
        <listeners>
                 <add name="messages"
                 type="System.Diagnostics.XmlWriterTraceListener"
                 initializeData="c:\logs\messages.svclog" />
          </listeners>
      </source>
    </sources>
</system.diagnostics>

<system.serviceModel>
  <diagnostics>
    <messageLogging 
         logEntireMessage="true" 
         logMalformedMessages="false"
         logMessagesAtServiceLevel="true" 
         logMessagesAtTransportLevel="false"
         maxMessagesToLog="3000"
         maxSizeOfMessageToLog="2000"/>
  </diagnostics>
</system.serviceModel>


  1. maxSizeOfMessageToLog is the message size in memory . This size can differ from the actual length of the message string that is being logged, and in many occasions is bigger than the actual size. As a result, messages may not be logged. So consider this situation and set the value of maxSizeOfMessageToLog appropriately.
  2. logMessagesAtServiceLevel This boolean value is for logging messages at service level. Messages logged at this layer are about to enter (on receiving) or leave (on sending) user code. By default all messages at the service level are logged. Infrastructure messages (transactions, peer channel, and security) are also logged at this level, except for Reliable Messaging messages. On streamed messages, only the headers are logged. In addition, secure messages are logged decrypted at this level.
  3. logMessagesAtTransportLevel This boolean value is for logging messages at transport level. Messages logged at this layer are ready to be encoded or decoded for or after transportation on the wire. By default all messages at the transport layer are logged. All infrastructure messages are logged at this layer, including reliable messaging messages. On streamed messages, only the headers are logged. In addition, secure messages are logged as encrypted at this level, except if a secure transport such as HTTPS is used.


Where to apply the log

You can apply the configuration on both service side and client side configuration file. You can analyse the log file which will be created after you run the service. Here if you are using the trace listener as-is then it will create a log file at "c:\logs\messages.svclog". you can change the file location as you like.

Recommended Setting for debugging 


When you are using logging in  debugging environment , and you are using WCF trace sources, set the switchValue to Information or Verbose, along with ActivityTracing. To enhance debugging, you should also add an additional trace source (System.ServiceModel.MessageLogging) to the configuration to enable message logging. Notice that the switchValue attribute has no impact on this trace source.
You can set the switchValue attribute to Information in all the previously mentioned cases, When you set the switchValue attribute to Information, it will log all messages. A recommended configuration is as shown below.

 <configuration>
 <system.diagnostics>
  <sources>
    <source name="System.ServiceModel" switchValue="Information,
 ActivityTracing"
            propagateActivity="true" >
      <listeners>
        <add name="xml"/>
      </listeners>
    </source>
    <source name="System.ServiceModel.MessageLogging">
      <listeners>
        <add name="xml"/>
      </listeners>
    </source>
    <source name="myUserTraceSource" switchValue="Information, ActivityTracing">
      <listeners>
        <add name="xml"/>
      </listeners>
    </source>
  </sources>
  <sharedListeners>
    <add name="xml"
         type="System.Diagnostics.XmlWriterTraceListener"
               initializeData="C:\logs\Traces.svclog" />
  </sharedListeners>
 </system.diagnostics>

 <system.serviceModel>
  <diagnostics wmiProviderEnabled="true">
      <messageLogging 
           logEntireMessage="true" 
           logMalformedMessages="true"
           logMessagesAtServiceLevel="true" 
           logMessagesAtTransportLevel="true"
           maxMessagesToLog="3000" 
       />
  </diagnostics>
 </system.serviceModel>
</configuration>

Recommended setting for Production environment 


When you are using logging in production environment, and you are using WCF trace sources, set the switchValue to Warning. If you are using the WCF System.ServiceModel trace source, set the switchValue attribute to Warning and the propagateActivity attribute to true. If you are using a user-defined trace source, set the switchValue attribute to Warning, ActivityTracing. If you do not fell like there will be any performance hit, you can set the switchValue attribute to Information in all the previously mentioned cases, When you set the switchValue attribute to Information, it will log all messages which will be a fairly large amount of data and this is why it should be avoided if you feel it will cause you performance hit. A recommended configuration is as shown below.

<configuration>
 <system.diagnostics>
  <sources>
    <source name="System.ServiceModel" switchValue="Warning"
            propagateActivity="true" >
      <listeners>
        <add name="xml"/>
      </listeners>
    </source>
    <source name="myUserTraceSource"
            switchValue="Warning, ActivityTracing">
      <listeners>
        <add name="xml"/>
      </listeners>
    </source>
  </sources>
  <sharedListeners>
    <add name="xml"
         type="System.Diagnostics.XmlWriterTraceListener"
               initializeData="C:\logs\Traces.svclog" />
  </sharedListeners>
 </system.diagnostics>

<system.serviceModel>
  <diagnostics wmiProviderEnabled="true">
  </diagnostics>
 </system.serviceModel>
</configuration>

After enabling WCF level logging you will come to know what is wrong in your system. When you have the type of exception that you have, its much simpler to fix it. :)


Introduction

  This fix explained here is helpful if you are using WCF and when you try to access the service, the client throws an exception like "An endpoint configuration section for contract ‘YourContract' could not be loaded because more than one endpoint configuration for that contract was found. Please indicate the preferred endpoint configuration section by name".

How to fix this exception 

  WCF service can expose more than one endpoint and client can use any of this endpoint but not more than one at a time. This type of exception occurs when you have more than one endpoint configured at your configuration file (app.config) file while adding service reference or while configuring service at client side manually. You can have only one and only endpoint for the client. If you are getting this exception then check your client side configuration file and make sure the client tag under system.serviceModel has only one endpoint configured.

<system.serviceModel>
   <client>
      <endpoint [...]>
     </endpoint>
   </client>
</system.serviceModel>


Introduction

WPF applications support rich media and graphics, this require styles and styles can be reusable across different window or element in WPF. Here we need a mechanism by which we can share this style across different window or say application. By adding the style in application resource file, we can share it across windows in application but not across application. Here reusable styles need to be utilized and in a managed way. Here WPF provide an easy way to manage these styles and other reusable resources which can be used across WPF windows and across application. This is called Resources Dictionary. We can define the styles in WPF XAML files and can manage all our useful styles for a particular application in a resource dictionary file. This resources dictionary can then be referred from other WPF projects and can use the styles in this resources dictionary in that project.

Using the code

Adding a resource dictionary is pretty simple. We have to select the project or folder in Solution Explorer and then right click and select “Add”. We will get a menu item called “Resource Dictionary”. Selecting that menu item will pop up the Add New Item wizard with the Resource Dictionary Item template selected. Rename the item as you wish. In a Resource Dictionary, we can keep our custom styles, Templates, custom definitions for Brush, Color, Background and a lot of other stuff. Most important thing is that we have to assign a key to each of them since it is a Dictionary and it stores the values besed on the key. Or perhaps, we can give names to the styles.

How to refer to Resource Dictionary and use it in WPF xaml.

In this section, we are going to see how we can import a resource file to a XAML file for a WPF Window, user control or a page.  We can refer to the resource dictionary that we created for our window resources section. Since we can have a resource dictionary for each control, we are going to merge the other resource files to the existing resource dictionary.

<Window […] >
    <Window.Resources>
        <ResourceDictionary>
            <ResourceDictionary.MergedDictionaries>
                <ResourceDictionary 
                  Source="ResourceDictionaryReferencePath/ResourceDictionaryName.xaml">
                </ResourceDictionary>
                <ResourceDictionary 
                  Source=" ResourceDictionaryReferencePath/ResourceDictionaryName.xaml ">
                </ResourceDictionary>
            </ResourceDictionary.MergedDictionaries>
        </ResourceDictionary>
    </Window.Resources>
    </Window>

How to refer to resource dictionary from another project.

If your resource dictionary is in a different project, then make sure that the project can be referred from the project that you need the resource. If not then WPF will throw an exception at runtime. Either add reference to that project or drop that project dll to your applications folder so that your application can refer to it. Here the source path depends on where you have added your dictionary. If you have added resource file to the root of your application, then you can refer to this file as

Source="ResourceDictionaryName.xaml"

If you have added this file to a directory in your project then you can refer to it as

Source= "ResourcesDirectoryReferencePath/MyResourceDictionary.xaml"

If you your resources dictionary is in another project then you can refer to it as

Source= "pack://application:,,,/ApplicationNameWhereResourceDictionaryResides; component/ResourceDictionaryName.xaml"


Introduction

 This post will help you in binding a command to a button, where the button is defined in a template say a data template. With normal command binding it won’t work. We need some sort of workaround to achieve this.

How to fix this.

 Here the requirement is to bind a command to an element which is defined in a template. When we do a normal command binding, it is not aware of the data context and will not resolve. We need to provide the binding with the data context. This can be achieved in many ways say you can do
<Button Content="{Binding}" Command="{Binding RelativeSource={RelativeSource Window}, Path=DataContext.ClickHandlerCommand }" />

<Button Content="{Binding}" Command="{Binding Path= ClickHandlerCommand, Source={StaticResource MainWindow}}" />

<Button Content="{Binding}" Command="{Binding Path= ClickHandlerCommand, RelativeSource={RelativeSource AncestorType={x:Type Window}}}" />

But these won’t work with all scenarios. But one solution will work with all scenarios. Define your data context as a static resource and refer it as the source of the binding. As shown below.

<Window […]
        xmlns:this="clr-namespace:Your.Namespace.For.The.ViewModel"
        […]>

    <Window.Resources>
        <this:MainWindowViewModel x:Key="Model" />

        <DataTemplate x:Key="ItemsDataTemplate">
          <Button Content="{Binding }" Command="{Binding Command, Source=                            {StaticResource Model}}" />
        </DataTemplate>

    </Window.Resources>

    <Window.DataContext>
        <this:MainWindowViewModel></this:MainWindowViewModel>
    </Window.DataContext>

        <Grid>
        <ItemsControl ItemTemplate="{DynamicResource ItemsDataTemplate"  ItemsSource="{Binding Collections, Mode=OneTime}" >
            
        </ItemsControl>
    </Grid>
</Window>

Introduction

In this post we will see how to fix the exception due to mixed mode assembly while working with version 4.0 of runtime.

Background

I was working with a project which uses an older mixed mode assembly and I got an exception like mixed mode assembly is built against another version of the runtime and cannot be loaded in the 4.0 runtime without additional configuration information. When I was able to fix this, I felt like this should be shared with all so that people can save their time.

Using the code

Mixed mode assembly is built against another version of the runtime and cannot be loaded in the 4.0 runtime without additional configuration information.
If you are using .net version 4.0 there can be a chance of getting an error like this.
Additional information: Mixed mode assembly is built against version 'v2.0.50727' of the runtime and cannot be loaded in the 4.0 runtime without additional configuration information.
This error happens because of the support for side-by-side runtimes, .NET 4.0 has changed the way that it binds to older mixed-mode assemblies. These assemblies are, for example, those that are compiled from C++\CLI. Currently available DirectX assemblies are mixed mode.

How did I fixed it

To fix this, You have to add the below settings to your App.config file under configuration tag.
<startup useLegacyV2RuntimeActivationPolicy="true">
    <supportedRuntime version="v4.0"/>
    <requiredRuntime version="v4.0.20506"/>
</startup>


Introduction

In this post we will see how to fix the exceptions like this which hapens even after adding proper dll(s). Here in this post we will see how to fix exception, "The type or namespace name Data does not exist in the namespace Microsoft.Practices.EnterpriseLibrary (are you missing an assembly reference?)"

Background

I was working on a project when I encountered one exception which was The type or namespace name 'Data' does not exist in the namespace 'Microsoft.Practices.EnterpriseLibrary' (are you missing an assembly reference?)
I added the proper dll reference but still I was getting this compilation error. I was wondering what is going wrong. I tried to browse the class inside this dll using object browser. I was able to find classes inside this dll. I tried to create an object of the class which was inside the dll; I was able to create the object while I was writing the code. When i build it, it again failed.

1. Added Proper dll reference but compilation fails.
2. Exception the type or namespace name 'Data' does not exist in the namespace even after adding proper dll references.
Using the code

How did I fix this exception

Finally when I check the project configuration, I was running .Net Framework 4.0 Client Profile. I made it to .Net Framework 4.0 and everything worked perfectly.

The .NET Framework 4 Client Profile is a subset of the .NET Framework 4 which is optimized for client applications. It provides functionality for most client applications, including Windows Presentation Foundation (WPF), Windows Forms, Windows Communication Foundation (WCF), and ClickOnce features. This enables faster deployment and a smaller install package for applications that target the .NET Framework 4 Client Profile. If you are targeting the .NET Framework 4 Client Profile, you cannot reference an assembly that is not in the .NET Framework 4 Client Profile. Instead you must target the .NET Framework 4. This is what happening in my case. :)

To change the Target Framework, Go to your project in the solution and right click on the project and select properties. In the window that comes up, select the Application tab. There you can see the Target Framework section. Select the .Net Framework 4 instead of .Net Framework Client Profile. :)


Sunday 8 March 2015

Introduction

You may experience this error if you try to compile a visual studio solution/project where it is referring to this Microsoft.Office.Interop.Outlook from GAC. This could also happen in a build server where you don’t have outlook installed. You may feel like you hit the dead end where you are forced to install the licensed Microsoft office tools. But we have another alternative which is completely free and ethical.

How did I fix this?

         This is the nuget package. We have a nuget library package which is an alternative to Microsoft.Office.Interop.Outlook. This has the same syntax as the interop Microsoft.Office.Interop.Outlook dll. This is called as NetOffice. All the syntax and classes will be same but reference will be different.

Friday 6 March 2015

Introduction

You may experience this error if you try to compile a visual studio solution/project where it is referring to Microsoft.Office.Interop.Excel from GAC. This could also happen in a build server where you don’t have or want any tools which are licensed because you don’t want to pay for it as you spawn servers at runtime. You may feel like you hit the dead end where you are forced to install Microsoft office tools. But we have another alternative which is completely legal and ethical.

How did I fix this?

This is the nuget package. We have this Microsoft.Office.Interop.Excel dll available as a nuget package. This is called Excel-DNA.Interop. This Microsoft.Office.Interop.Excel dll which comes in this nuget package has no dependency and is pretty straightforward to use. Use it just like any other nugget package!

Wednesday 25 February 2015

Introduction

We may get this error when we try to execute an application which has CPP component. Here MSVCP100 is a file which should be installed along with Microsoft Visual C++ 2010 Re-distributable Package. Here 100 means 2010 and D means debug version. This error occurs only when you are trying to run your application which is compiled using the “debug” configuration instead of “Release”.
     Here when you try to run the application which was the debug output, then it would expect the appropriate file which has the Debug version, when you don’t have visual studio installed on your machine, then you will experience this kind of issues.

You can fix it in three different ways. You only have to follow any of the below

  1. Install visual studio.
  2. Build your application using release configuration.
  3. Copy the files to system32 folder.
The first two options are straight forward.

3. Copy the files to system32 folder

Here you can find the missing dll from internet but never ever do that! Those files could be contaminated either intentionally or unintentionally and it may help expose your machine to virus attack.
What you have to do is, find a machine which has visual studio 2010 installed, If you are running the application in a 32 bit machine, then go to C:\Windows\System32 and copy the missing file and place it in C:\Windows\System32 of the machine where you want to run your application.
    If you are running your application in a 64 bit machine, then the folder where you have to copy the file is bit different. You have to go to C:\Windows\SysWOW64 and copy the missing files and paste it to C:\Windows\SysWOW64 of the machine where you have to run the application. This will help you fix the error.
    In in case you have copied from system32 folder and you have placed in SysWOW64 folder, then you may end up getting an error like "The application was unable to start correctly (0xc000007b)".


Monday 19 January 2015

Introduction


In this post we will see how to add hot keys to WPF window. Hot keys are keyboard shortcuts with which we can easily navigate through the window without the help of a mouse. Hot keys are those which when pressing “Alt”+ hotkey character will take you to the control associated with that hot key.

Background


When we have a window, which have many controls we need hot keys which will help users to navigate through the UI controls. When users are used with keyboard, they tend to use keyboard itself and avoids mouse most of the time. Keeping such users in mind, we have to provide hot keys in our application window.

You can find the hot keys in an application by pressing the “Alt” button on your keyboard. When you press on the “Alt” button, all those hot keys will be shown as an underlined character. Now if you press “Alt” + “HotKey” you can navigate to that control. For example, if you take the Remote Desktop Connection window in your windows (type mstsc in your run window) and when you press “Alt” button, you can see an underline on each character which is associated with hotkeys. And now if you press “Alt” + that character you can navigate to the control associated with that hot key.
Here in this post we will see how to associate a hot key to WPF window.

Using The Code


Here we will create two textbox and two label associated with that text box. When we press “Alt” button, these labels will highlight the hot keys. When we press Alt + Hot key character, it will take the focus to those text box which is associated with that hot key. Let’s create two textbox and two label which is associated with the text box.
<Grid>

   <ItemsControl>
    <Label Content="FirstBox" Width="100" Height="28" Name="label1"/>
    <TextBox Name="textBox1" Text="Title" Height="50" ></TextBox>
   </ItemsControl>
   <ItemsControl>
    <Label Content="SecondBox" Width="100" Height="28" Name="label2"/>
    <TextBox Name="textBox2" Text="Title2" Height="50" ></TextBox>
   </ItemsControl>
</Grid>


Now let’s see how to associate hot keys to the labels. This is pretty much simple; just add an underscore before the character of the label content which you need as a hot key. Here we will make “F” as the hot key for our label1 and “B” as the hot hey for label2.
<Grid>
   <ItemsControl>
    <Label Content="_FirstBox" Width="100" Height="28" Name="label1"/>
    <TextBox Name="textBox1" Text="Title" Height="50" ></TextBox>
   </ItemsControl>
   <ItemsControl>
    <Label Content="Second_Box" Width="100" Height="28" Name="label2"/>
    <TextBox Name="textBox2" Text="Title2" Height="50" ></TextBox>
   </ItemsControl>
</Grid>


Remember our hot key is intended for textbox so we need some mechanism by which we can pass the control to the text box from labels. We can use the Target property of the Label control to assign the Label to the TextBox and this way we can set the access key for the TextBox. Now bind the label to the textbox using the target attribute.
<Grid>
   <ItemsControl>
    <Label Content="_FirstBox" Width="100" Height="28" Name="label1" Target="{Binding ElementName=textBox1}"/>
    <TextBox Name="textBox1" Text="Title" Height="50" ></TextBox>
   </ItemsControl>
   <ItemsControl>
    <Label Content="Second_Box" Width="100" Height="28" Name="label2" Target="{Binding ElementName=textBox2}"/>
    <TextBox Name="textBox2" Text="Title2" Height="50" ></TextBox>
   </ItemsControl>
</Grid>


Now run the code and see your hot keys working!