Tuesday, 29 May 2018

Introduction

This post is about implementing a web-job in azure which will restart a service on a predefined interval. When restarting a service on a predefined interval clearly says that there is some problem with the implementation, we may rely on this as an emergency measure until we tackle the problem. Here we will ignore the implication behind it but will focus on how to get this done. To get this done, we need an application in AD which has the required permission to restart the service. The components which are required in this process are as mentioned below. Even when scripts are available to create application for you, it is good to go via the portal way to make sure that we do what we understood.


  1. AD app
  2. PowerShell script
  3. Web Job service

AD app

It is with this application that we are going to restart the application. This application should have the required permission to restart the service. In order to create this app you have to go to the 
Azure AD blade -> App registration -> New application registration

Once you have created the application using the desired name and an url(dummy also works), you have to set the service principal for the application. For this you should go to the settings of the application and select keys. Now to add key, you have two different ways. One by using a public/private key and the other by using a key and a password pair. Here we will try the key password pair for our example. To do this, create a key by entering a description and expiry as desired. Now save this and it will generate a password for you. You must save it to some safe place as you will not be able to find it again. Now your application is ready. Now we must assign a role to this application.


How to assign a role to AD app

In order to assign a role to the application in the desired resource group, you have to go to the desired resource group then select Access control and click on Add(+). Now it will open a blade to where you can select a desired role. In this case we will select the owner role. Now to the “select” text box, type your application name which you have created in your AD. It will list your application. Select that and click on save. Now you have assigned a role for the application in your resource group. Now with this you are ready to restart your application. We now need a script which can execute the restart logic.


Powershell script.

Below is the script which is the restart logic for your webjob.


$ProgressPreference= "SilentlyContinue"
$appId = "your application id"
$tenantId = "the tenant id"
$password = "password"
$subscriptionId = "subscription id"

$secpasswd = ConvertTo-SecureString $password -AsPlainText -Force
$mycreds = New-Object System.Management.Automation.PSCredential ($appId, $secpasswd)
Add-AzureRmAccount -ServicePrincipal -Tenant $tenantId -Credential $mycreds
Select-AzureRmSubscription -SubscriptionId $subscriptionId
Stop-AzureRmWebApp -Name 'name of your service' -ResourceGroupName 'Name of your resource group'
Start-AzureRmWebApp -Name 'name of your service' -ResourceGroupName 'Name of your resource group'

** Description
$appId = "This is the application id of the application which you have created in the AD"
$tenantId = " Go to Azure AD blade, select app registration, Select endpoints and find the tenant id from any of the url mentioned. From the url you can find the tenant id. It is the one which looks like a guid."

$password - This is the secret key which you got at the time of creating a key for your application. The one which you have saved
$subscriptionId = "In azure, Go to the service that you want to restart and you can find the subscription id”

Now we need a web job which can execute this job on a periodic interval without any intervention.

WebJob

To create a webjob, go to the resource group and select your service where you need a restart logic. Select webJobs from the settings blade of your service. Click on Add(+) and create a new web-job. Give a proper name then Upload the PowerShell script which you have created earlier and Select Triggered as the type of the job. And to the cron expression provide the desired trigger pattern. In our example we will try to run this job every minute. The pattern should be 0 * * * * *. Now say ok and your job will restart the service.


Now every minute is too much of restart. Provide the pattern which you desire. You can create a pattern which azure accepts from https://cronexpressiondescriptor.azurewebsites.net/

By default, azure will unload the service from the instance where it runs and recycle the instance if the service is idle for some period. To have a web job to run properly, we should disable this behaviour by stating that we want the service to be available always even if there is no traffic. We can do this by enabling the “Always on” option. To do this, you should go to the service and select the application settings and set the always on to “On” and save the setting.


Thursday, 10 August 2017

Introduction

         Logging is one of the very important factor in any application. You require it to analyse what when and how things went wrong. It serves as the log of the application. But when you have multiple instance of the same application running in parallel, then you don’t have the purpose served properly by the logging mechanism as it will be writing all the log entry into the same file and the log will be cluttered. Here in this post we will discuss how to handle this typical situation when you have multiple instances running at the same time and log4net writes all the logs into the same file.

Possible solutions

  1. Let log4net write each log entry with the process id.
  2. We can have log4net write the log in to different file appended by a process id or anything similar.
  3. Log it into a central location with process Id or something similar.
  4. Log everything into same file but append an identifier to each log entry.

     Here we are going to look at a solution which can be called as a combination of 1&2. We will have log4net write to a different file if another instance is running. If not then it will use the same log file. From management perspective it would be nice to have only one file because then we can have a log rotate and keep the file under manageable size. when we have another instance running then it will be logged into a file with the time appended to the file name. This way we can handle logging by second instance. Let us now see how this is achieved using log4net.

Drawback of this solution:

     When you have an application which has high probability of running multiple instances, then you are going to have many log files which will not be rotated or handled by the logging mechanism. So choose this solution if the situation where you have multiple instances running in parallel are rare.

To achieve this we will be using two concepts.

  1. Pattern Converter in log4net
  2. Inter process synchronization technique.

Pattern Converter in log4net

      Log4net has this pattern converter which you can use in the configuration. Here we will make use of it to handle the file name. Let us see how to achieve this. I will not be discussing the complete configuration of log4net and the below shown code is just a snippet from the configuration. This is as shown below.

<appender name="FileAppender" type="log4net.Appender.RollingFileAppender">
    <file type="log4net.Util.PatternString">
      <converter>
        <name value="fileName" />
        <type value="SampleApp.FilePatternConverter,SampleApp" />
      </converter>
      <conversionPattern value="${APPDATA}\LogFolder\%fileName" />
    </file>
</appender>

Here we have defined a converter for the file name. Conversion pattern is the format for the file name. Here "${APPDATA} specifies the system defined application folder and it has nothing to do with the pattern. %fileName is an identifier which redirects to the converter with name as filename. We have defined a converter with name as filename and value as SampleApp.FilePatternConverter,SampleApp. Here SampleApp.FilePatternConverter specifies the namespace and the class name of our converter class and SampleApp is the assembly name where we can find the converter. Now let us see how the converter class looks like. It is as shown below.

namespace SampleApp
{
    using System.IO;

    public class FilePatternConverter: log4net.Util.PatternConverter
    {
        protected override void Convert(TextWriter writer, object state)
        {
            String filename = “logfile.log”;
            var logFileName = LogFileNameConverter.GetLogFileName(filename);
            writer.Write(logFileName);
        }
    }
}

The text writer will then replace the pattern in the configuration. To be precise it will replace %fileName from the conversionPattern with the log file name. Here the core of the logic is in another file and lets have a look at it. It is as shown below.

public class LogFileNameConverter
    {
        private const string FileName = "application.log";
        private static readonly Mutex ApplicationSyncLock;
        private static readonly bool LockAcquired;
        private static string dateToAppend;
        
        static LogFileNameConverter()
        {
            try
            {
// register an application exit event and release the mutex lock.
                Application.Current.Exit += CurrentExit;
                bool created;
                ApplicationSyncLock = new Mutex(false, "ApplicationMutexName", out created);
                LockAcquired = ApplicationSyncLock.WaitOne(2000);
            }
            catch (AbandonedMutexException)
            {
// here will will release the abandoned mutex.
                ApplicationSyncLock.ReleaseMutex();

                //lets acquire the lock.
                LockAcquired = ApplicationSyncLock.WaitOne(2000);
            }
            catch (Exception)
            {
                LockAcquired = false;
            }
        }
 
        public static string GetLogFileName(string logFileName)
        {
            if (string.IsNullOrEmpty(logFileName))
            {
                logFileName = FileName;
            }
 
            if (LockAcquired)
            {   
                return logFileName;
            }
            else
            {
                var extension = Path.GetExtension(logFileName);
                var fileName = Path.GetFileNameWithoutExtension(logFileName);
                if (string.IsNullOrEmpty(dateToAppend))
                {
                    Regex rgx = new Regex("[^a-zA-Z0-9]");
                    dateToAppend = rgx.Replace(DateTime.Now.ToString(CultureInfo.InvariantCulture), "-");
                }
 
                fileName = (fileName + "-instance-at-" + dateToAppend + extension).Replace(' ', '-');
                return fileName;
            }
        }
 
        private static void CurrentExit(object sender, ExitEventArgs e)
        {
            ApplicationSyncLock.ReleaseMutex();
        }
    }


Here we use named Mutex as an inter-process synchronization or signalling. We acquire a mutex lock and keep it locked till the application exits. The new instance will not be able to acquire a lock and will move ahead and create a new logfile name with datetime append to the filename. Here we chose Mutex because it has a mechanism where we can handle the abandoned Mutex which results from an application which had the lock got terminated from task manager. When a new instance of application is launched we can handle this abandoned mutex.

This is all you need and when you run multiple instance, it will start to write to a different file. If you are running it in serial then you have all the log in one file and log rotate will make sure that you have only one file with the specified size.

Now if you like to pass the log file name from the configuration itself, then also it is possible. Let’s see how this is achieved. The converter should have property attribute defined and this will be available in the converter. Let’s see how this looks like. This is as shown below.

<appender name="FileAppender" type="log4net.Appender.RollingFileAppender">
      <file type="log4net.Util.PatternString">
        <converter>
          <name value="fileName">
          <type value="SampleApp.FilePatternConverter,SampleApp">
          <property>
            <key value="FileName">
            <value value="app.log">
            </value></key>
</property></type></name></converter>
        <conversionpattern value="${APPDATA}\LogFolder\%fileName">
      </conversionpattern></file>
</appender>

Here we have defied a property with key as “FileName” and value as “app.log”. This will be available in the converter class as shown below.

protected override void Convert(TextWriter writer, object state)
{
            string fileName = this.Properties["FileName"] as string;
            var logFileName = LogFileNameConverter.GetLogFileName(fileName);
            writer.Write(logFileName);
}


4.Log everything into same file but append an identifier to each log entry

Now that we have seen this solution, let us see how "Log everything into same file but append an identifier to each log entry" can be achieved. For simplicity I am using the exact same converter.
We can achieve this by modifying the layout of log by using the below mentioned configuration.

<layout type="log4net.Layout.PatternLayout">
<converter>
       <name value="fileName">
       <type value="SampleApp.FilePatternConverter,SampleApp">
       <property>
         <key value="FileName">
         <value value="app.log">
       </value></key></property>
    </type></name></converter>
    <param name="ConversionPattern" value="%fileName %d [%t] %-5p [%C %F %L] - %m%n" />
</layout>
    

Monday, 8 May 2017

Introduction:


   A recent encounter in windows server where a need for a folder alias was unavoidable, we made a discovery that unlike linux, folder alias is hard to achieve in windows command for windows version less than windows 10. Though it is achievable, it is hard to achieve when the target directory path is dynamic. This lead to a search for the alternative to deploy in this scenario. The scenario was when we have to use the editbin.exe and its LARGEADDRESSAWARE where we discovered that LARGEADDRESSAWARE take only a particular character length for the input file and if there are more then it will trim it. This was leading to an error:

The alternative was to CD into the folder and execute the command and get out of the folder. And we have something called as setlocal which help us achieve this by scoping the step in and out of a folder. Setlocal will help us scope the working directory and reverts the working directory when the scope is over. The below snippet shows how we can achieve this. I was using this in VisualStudio postbuild event.

setlocal
cd
cd $(TargetDir)
cd
IF EXIST C:\masm32\bin\editbin.exe (
  C:\masm32\bin\editbin.exe /LARGEADDRESSAWARE $(TargetFileName)
) 
endlocal


Wednesday, 14 December 2016

Introduction

   I started on this issue when I had my WCF service times out when I am trying a normal socket connection. This was running fine in windows 8. We had a keep-alive WCF call which tells the server that the client is still active. For this we need the port sharing to be enabled on the machine. I was on an impression that the port sharing was not working and because of which it fails. From the log I came to a conclusion that the keep alive was failing so this made me doubt the TCP port sharing. But I could also see that when I install visual studio, then the application works. This made me doubt the .net framework. Finally I detected the slow network. This was the real culprit.

Windows 10 comes with a real time protection which scans each packets received across TCP. This slows down the network. The fix for this is to disable the real time protection.

On the windows settings you can find windows defender. You can switch off real-time protection.

But nothing is intended for bad purpose. So let’s not disable it. We have an option of setting the exclusion list. We have to use that to ignore known applications from this real time scanning. This was we can bring the application back to normal.


Friday, 22 July 2016

Introduction

  It is important that we test an application in all network conditions. This is because we may want to put demand on a system or device and measure its response to determine a system’s behavior under both normal and anticipated peak load conditions. This makes sure that the application is robust enough to handle all the network conditions before we roll out to users. It would be a painful task to do this kind of testing without the help of any software which hook up the adapter and controls the packet flow. In the absence of such software we will have to manually pull the network wires every time. Also this approach won’t help us test the spiky network conditions. To help us in these testing we have a tool which is called Network Emulator for Windows Toolkit (NEWT). In this article we will see how to configure and use Network Emulator Toolkit to test an application in limited network bandwidth.

Network Emulator Toolkit

NEWT is a software-based solution that can emulate the behavior of both wired and wireless networks using a reliable physical link, such as an Ethernet. It is available in a 32 Bits version and a 64 Bits version. You can download this from https://blog.mrpol.nl/2010/01/14/network-emulator-toolkit. This is a pretty handy tool which can mimic all the behaviors of a network. It can be configured to setup latency on packets in the network and can be configured to raise random errors and can be configured to not to deliver some packets and many more. Here I will show some of handy features of this tool. But all other functionality will be self-explanatory once you start using this tool.

1. Configure Network Emulator Client for limited bandwidth.

 This setup is relatively simpler. The network emulator has an option to select the network type. We could choose the dial up network so that it allows packets up and down as if we have a dial up network.
Once installed, open the Network Emulator Client in administrator mode. This will open up Network Emulator Client as shown in the figure below. Here you can see the drop down to select the network types. Select the dial up option from it. It then automatically opens up the default configuration for the dial up setup. For this example the only thing which we require is this configuration. Now we have to press the start button and the network emulator will start controlling the packets.

Configure Dial-up

After configuring Dial-up network

2. Configure Network Emulator Client to mimic spiky network which can also drop some packets.

 In order to configure the advanced scenarios, let us see two important configurations in network emulator. These are Link and Filter. Link defines the network behavior when sending and receiving packets. This configuration can be used to configure packet loss, network error, packet latency, bandwidth and spiky network (connect/disconnect). Filter is used to configure the sender and receiver to which the link configuration is applied. With filter configuration you can control whether the link configuration should be applied to all traffic or to traffic from a particular IP. These configuration objects are as shown in the image below.

Configuration options
In order to configure this scenario, we have to first select the network type, let us use the dial-up network this time. You can select this from the drop-down at the top just like the way you did it in the first scenario. This opens up a channel page where the link and filter is configured. Right click on the link object and you can see a pop up window with options for UpStream and DownStream. Both have the same configuration. UpStream defines the network behavior for packets which are send from the local machine and the DownStream defines the other way. When you click on one of these, it opens up a window where you can configure loss, error, latency, bandwidth, and connect disconnect behavior of the network. This is as shown in the image below. The default option is “No” we have to select the appropriate one which we want.


The filter option is set by default. If you want to control the filter, you can right click on it and say delete. Now from the menu in the top bar, select “Configuration” and then select “New Filter”. Here the default option is all network which says the link configuration will be applied to all network cards. You can also see an option of selecting the sender and receiver, you can use this option if you want to control traffic from a particular source. Once configured, you need to press on the start button and it will control the behavior of the network.


Thursday, 4 February 2016

Introduction

    In this article I will explain in detail how to setup SQLite with EntityFramework. Setting up SQLite and EntityFramework is straight forward but when I tried, it turn out that the version available at the time when this article was written is not really straight forward. So I thought of sharing this in the form of an article. In this article we will see how we could setup a Database First Entity model with SQLite with just a simple table. In this article we will also move the SQLite and EntityFramwork into a separate dll unlike other sample applications. This is to address another scenario which we will see later in this article.

For this article we will be using

  1. Visual Studio 2012
  2. SQLite 3
  3. EntityFramework 6
  4. .Net framework 4.5

Building the application.

    Here in this example we will be having a single visual studio solution with two projects which targets .net framework version 4.5. To start with let us create an application and name it as StockWatch and the framework version should be 4.5. The main application could be any project type. This will be our main project. In my case I have created a WPF project. Now let us create a ClassLibrary project and name it as DataService and the .net framework should be 4.5. This is the project where we will be handling everything related to SQLite and EntityFramework. The main project will just remain as a dumb project which will refer to the DataService project and will fire a call to this project. This is not necessary to get everything up and running but this is to show one scenario while using SQLite which we will find towards the end of this article.

   SQLite is a third party database and there is no inbuilt driver (ADO.Net provider) in .net framework to connect to this database. To connect to the SQLite database, we need an ADO.Net provider (driver) and this is provided by the SQLite website and can be found as a nugget package. System.Data.SQLite is an ADO.NET provider for SQLite. We need it in our project to proceed with SQLite. The name of the nugget package is also System.Data.SQLite. When we install this package, it will also install EntityFramework. This package comes as a complete package for getting everything done with EntityFramework and SQLIte. So let us install this first into our DataService project.


    The prior requirement for this article is that we need an SQLite3 database with a simple table having two fields (id and name). We will now create an EntityFramework model out of this existing database. Currently EntityFramework supports ModelFirst approach but it is expected that they are going to drop ModelFirst approach going forward and we will not find this in EntityFramework7. Moreover SQLite provider for EntityFramework6 (System.Data.SQLite.EF6) does not support creation of table (such feature is not supported till date). So we cannot implement ModelFirst approach with EntityFramework when the database is SQLite. So here we will only address DatabaseFirst approach.


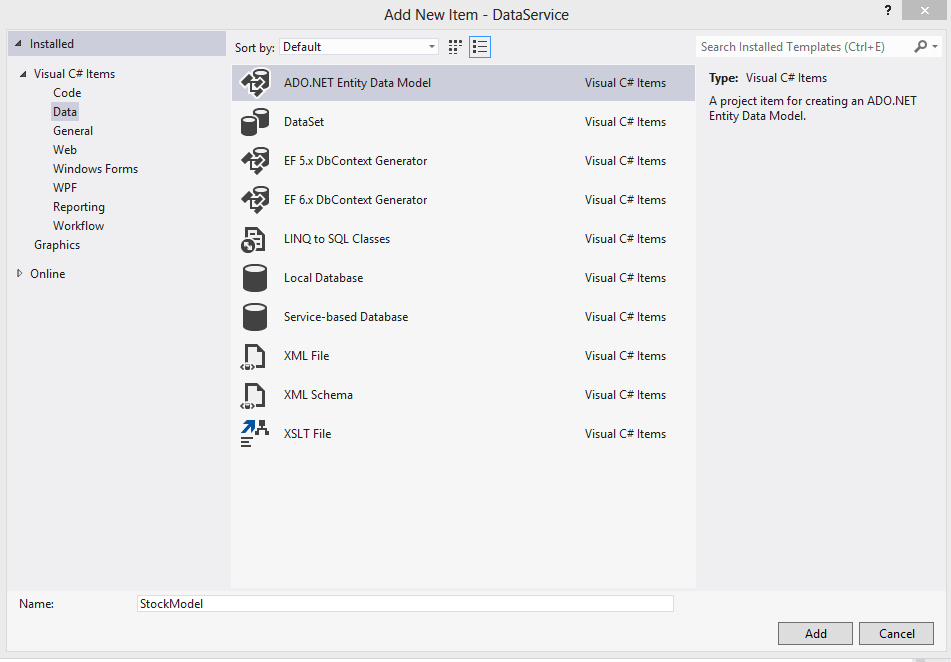
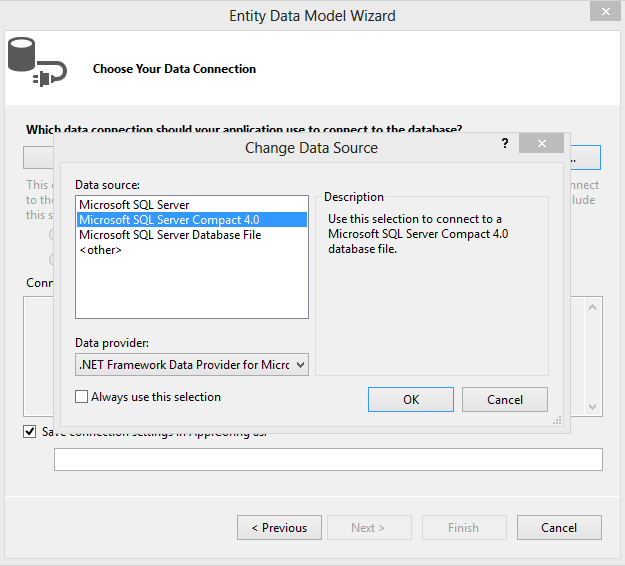
    We will now create a model out of this existing database. To do this, create a new “ADO.Net Entity Data Model” item to the DataService project and name it as “StockModel” and proceed. From the “Choose Model Contents” dialog which pops up, select “EF Designer from database” and proceed. Now on the “Choose Your Data Connection” dialog which pops up, click on the “New Connection” button which pops up another “Connection Properties window”. On the “Data source” section click on “Change” button which will open up another dialog to Change Data Source as shown below. 


    Here we are missing the SQLite Data source in the dropdown. If you can see an entry for SQlite, then you already have everything ready in your machine and you can skip this step. Now if you are also like me, then we need to install an SQLite component for VisualStudio to have it list here. To get this component we have to go to the SQLIte site(https://system.data.sqlite.org/index.html/doc/trunk/www/downloads.wiki) and download the appropriate package for the version of visualstudio which we use. In my case I am using VisualStudio 2012 so I will download a package for VisualStudio 2012 as shown in the image below. Also the version of the package should be same as the version of the SQLite nugget package (See Issue 3 at the bottom of this article)


Now install this after downloading. While installing don’t forget to mark the option to install SQLIte component to GAC and to install the designer component for visualstudio. Once installed, please restart your machine. Once done, come back to the step where we were about to change the data source, now you can see SQLite component listed in the list and Select it and proceed.


   Now it will show another dialog asking you to select your data base, here you browse and find the database which you have created. Now when you say OK to this dialog, it will create a model out of your database.

Issue 1

You may get some error at this point like “Unable to determine the provider name for provider factory of type 'System.Data.SQLite.SQLiteFactory'. Make sure that the ADO.NET provider is installed or registered in the application config.”

This is a bug in SQLite provider. Install SQLite nugget package into the project after changing the framework version to 4.0 and later change it to whatever .net framework which you desired. This will be a one time activity and later if you wish to add this package from project which targets 4.5, then also it will work.


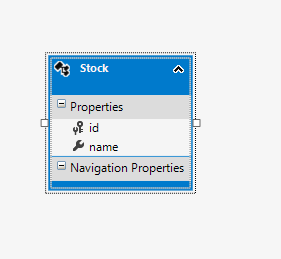
Now once you have fixed all issues, and when you create a model, you will get the model diagram as shown above. Now we will try to add some stock into the database using EntityFramework. For this we will create a class file in DataService project as shown below.

public class StockService
{
   private StockTradeEntities conn;
   public StockService()
  {
    conn = new StockTradeEntities();
  }

  public void AddStock(string stockCode)
  {
    Stock st = new Stock();
    st.name = stockCode;
    conn.Stocks.Add(st);
    conn.SaveChanges();
  }
}

Now refer this project from the main application and fire the method AddStock(). This will add the stock item into database. Here when you try to run the application and when you fire the AddStock method, you will get an error as below.

Issue 2

The Entity Framework provider type 'System.Data.Entity.SqlServer.SqlProviderServices, EntityFramework.SqlServer' registered in the application config file for the ADO.NET provider with invariant name 'System.Data.SqlClient' could not be loaded. Make sure that the assembly-qualified name is used and that the assembly is available to the running application.

  Now here all of our SQLite setting is added to the app.config file of our main application and it is expected that SQLite dlls must be present in the output folder where we have the app.config file. We could add the nugget package reference to the main application to fix this, but this breaks the convention of a standard application because for an enterprise application, we would expect that functionalities should be moved as separate modules for better maintenance and adding reference to components used in another module to main application doesn’t look nice or it doesn’t make sense. Here what we could do is that we will change the output directory of the DataService project to point to the same output directory of your main application. This way all the dlls referred by your SQLite module project will be available in the same folder where you have your application config file. This way you could fix this issue.

Issue 3

Cannot find the SQLite Data source in visual studio data source list even after installing SQLite component for Visualstudio.

  Here if you are getting this issue, then please make sure that you have added the SQLite nugget package to the project where you are trying to create a model. This step is necessary to have it listed in the visual studio list of data sources. When you add the nugget package, it adds certain entries to the app.config. These entries are necessary for visual studio to list the component in the data source list.


Now this is all about setting up EntityFramework and SQLite. Now you can build more functionality on top of this. :)


Tuesday, 20 October 2015

Introduction

    Starting with IIS 7, we can have IIS hosting application which can run on separate App-domain. Running application on separate App-domain is required when we need application to work in isolation i.e. to prevent applications in one application pool from affecting applications in another application pool on the server. An application can have several virtual directories, and each one will be served by the same App-domain as the application to which they belong. In most of the cases it should be fine to run an application in the default app-domain created by IIS. But on special scenarios say for example, if you want your application to be served by a different version of the run-time, then you can create an app-domain by specifying the run-time version and can use that to serve the application. Or if you want your applications to work in complete isolation then also you can do the same. Here in this post we will see how to host multiple WCF service under one website where each service is running in isolation with each on separate app-domain.

Hosting WCF service using separate app-domain.

  An application is an object important to the server at run-time. Every website object in IIS must have an application and every application must have at least one virtual directory where each virtual directory points to a physical directory path. When you create a website object in IIS, you are creating a default application. An application can have several virtual directories. To know how you can host a WCF service in default application in IIS, you can refer to the article [Article] How to host a WCF service in IIS 8. Let us now examine how we have created a website object with default application.


  Here in the IIS, in connections section, on Sites, when we right click and say “Add website” it opens up a website object(default application) creation wizard like as shown in the image above. Here “Site name” refers to the name of the site(application) which you want. “Physical directory” should point to the root directory of the website. Just for the demo purpose we will point the physical directory to an empty folder. It could also be a root folder of one WCF service where you have the .svc file. And in the section where it is asking for the “Application pool” is where we have to select the application pool or so called app-domain. Here at the moment we only have a default app domain so we will leave it as is. And if you say ok, then the website object is ready. Now what we have done here is we have created a website object, we have created a default application, we have created a virtual directory which will point to the physical directory as specified in “Physical directory” and the default application will now run in an app domain specified by us in the “Application pool” section. Now we will see how we can create another app-domain.

Creating Application Pool(App-domain)

In IIS, on the connection section, if you expand the server node, you can see “Application Pool” node. On the “Application Pools” node if you right-click and say “Add Application Pool” it will open up a window as shown below. Give a name for your new app-domain, this could be any unique name. and select the version of run-time which you like the application to run with and say Ok. Now your new app-domain is ready to use. 


Adding new application object

  Now on to the website object which we just created, right click and say Add Application, it opens up a wizard to create an application object under the website object. Now in this wizard, Alias is the name which we are going to give to the application and this name is also going to be the part of the url of the application so give it a proper name. The Physical Path is where your root folder for your wcf service where you have the .svc file. Now the Application pool section is where you can select your App-domain which you created just before.


Now when you browse the .svc file from the application folder, IIS will then use the App-domain which you have assigned for the application to serve the request. In this way you can create more app domain and more WCF services which will then work in isolation.


Introduction

    In this post we will see how we can identify if the application has been maximized or it is restored to normal state. We will use the Resize event equivalent in WPF which is SizeChanged event. We will subscribe to this event and will check the window state to identify if the window has been maximized or it is restored to normal.
Application.Current.MainWindow.SizeChanged += WindowSizeChanged;
private void WindowSizeChanged(object sender, SizeChangedEventArgs e)
{
    this.HandleWindowState();
}
 
private void HandleWindowState()
{
    WindowState windowState = Application.Current.MainWindow.WindowState;
    if (windowState == WindowState.Maximized)
     {                    
     }
    else if (windowState == WindowState.Normal)
     {                    
     }            
}
And let’s not forget to clean it by unsubscribing to the SizeChanged event by
Application.Current.MainWindow.SizeChanged -= WindowSizeChanged;

Saturday, 17 October 2015

 Introduction

  Here in this article we will see how to configure and host a WCF service in IIS 8. When we want to expose our service to internet, hosting it in IIS is the easy and effective way to do it. When you host it in IIS, it comes with all the added advantage of the web server. If you don’t want to host in IIS, you could still do that with a console application running in a server machine. To know more on hosting a service in console application and exposing an http endpoint, you can refer to [Article] How to host a WCF service in console application using wsHttp binding. The entire configuration which you will see in this article will be for Windows 8 and Visual studio 2012.

  1. Configure IIS
  2. Create a WCF service.
  3. Hosting in IIS

1. Configure IIS

  • Enable IIS – Internet information service (IIS) will be disabled by default in windows 8. We need to enable this as a first step in hosting wcf. To do this you have to go to Control Panel -> Programs and Features and select Turn windows features on or off from the left side menu and enable IIS.


  • Enable Asp.Net – The runtime which is going to serve your wcf service when you host it in IIS is the ASP.Net. By default this is disabled in IIS, we have to enable this. Without ASP.Net IIS will not be able to serve your WCF service. To enable ASP.Net you have to go to Control Panel -> Programs and Features and select Turn windows features on or off and under Internet Information Service->World Wide Web service->Application Development Features select the ASP.Net version which you want.


  • Enable WCF and its HTTP endpoint feature – We have to enable WCF and the WCF HTTP Activation feature in IIS. Without this IIS won’t be able to recognize the WCF service and it won’t be able to serve it. To enable this, go to Control Panel -> Programs and Features and select Turn windows features on or off and select .Net Framework 4.5 Advanced Services and enable WCF Services and HTTP Activation under WCF.


With this our basic features in IIS to host a WCF service is enabled. Now restart IIS and we should be able to host the WCF service.

2. Create a WCF service

  Here to test hosting a WCF service, we will create simple WCF service. We will then host this WCF service to see it in action in IIS. To begin with, let’s create a service. Create a folder called Host_wcf. Inside this folder create another folder and name it as App_Code. To this folder, create a file called DataService.cs and copy paste the service code as given below.

using System;
using System.Collections.Generic;
using System.Linq;
using System.Text;
using System.Threading.Tasks;
namespace SqliteService
{
    using System.ServiceModel;
    [ServiceContract()]
    public interface IDataService
    {
        [OperationContract()]
        void AddCustomer();

        [OperationContract()]
        void AddProduct();
    }

    public class DataService : IDataService
    {
        public void AddCustomer()
        {
        }

        public void AddProduct()
        {
            throw new NotImplementedException();
        }
    }
}


Now create a file called services.svc in the root folder, i.e. to Host_wcf and add the below line of code into it.
<%@ServiceHost language=c# Debug="true" Service="SqliteService.DataService" CodeBehind="~/App_Code/DataService.cs" %>

Here CodeBehind points to the file where we have the service implementation. Now we need a Web.config file in the root folder i.e. at Host_wcf folder. Copy paste the below line of code into it. Here the configuration is a prebuild configuration, to know more on how to create this end point, go to [Article] How to host a WCF service in console application using wsHttp binding.

<?xml version="1.0" encoding="utf-8" ?>
<configuration>
  <system.serviceModel>
    <behaviors>
      <serviceBehaviors>
        <behavior name="MEX">
          <serviceMetadata httpGetEnabled="true" httpsGetEnabled="false" />
        </behavior>
      </serviceBehaviors>
    </behaviors>   
    <services>
      <service behaviorConfiguration="MEX" name="SqliteService.DataService">
        <endpoint address="Mex" binding="wsHttpBinding" bindingConfiguration=""
          name="Mex" contract="IMetadataExchange" kind="" endpointConfiguration="" />
        <endpoint address="IDataService" binding="wsHttpBinding" bindingConfiguration=""
          name="wsHttp" contract="SqliteService.IDataService" />
        <host>
          <baseAddresses>
            <add baseAddress="http://localhost:80" />
          </baseAddresses>
        </host>
      </service>
    </services>
  </system.serviceModel>
</configuration>

Now we need to set the permission for the root folder so that IIS can access content from this folder. Go to security settings of the root folder and give read and execute permission for “Everyone”. With this, we are ready with the service. When you host a service in IIS, it is the ASP.Net runtime which compiles the code behind and serve the service. So make sure that it is error free and it can compile properly. Alternatively you can create a WCF project using “WCF Service Application” project template in visual studio and compile the code to make sure that it can compile properly.


3. Hosting in IIS

Now we will see how we can host a service in IIS. Let us launch IIS. To do this type “inetmgr” in Run, it will open up the Internet Information Service (IIS) Manager. Now expand the server from left hand side under Connection section. Now expand Sites. Here we will have a default website running, the default website will be using port no 80. We are also going to host the service on port 80 which is the default http port. We cannot have two websites using same port. So we will stop the default website for time being. To do this, right click on the Default Web Site and from Manage WebSite say stop. Now right click on the Sites and say Add Website and fill in the details as shown in the image below. We can also host our service as an application under the default website but let’s do it this way.


Now here the physical path is the path to our root directory which we created to hold the wcf service files. Say OK and your service should be ready to use now. Now to confirm this, we will browse the .svc file in our service.


If everything is fine, it should pop up a page which looks something like as shown in the image below.


Monday, 12 October 2015

Introduction

    In this article we will see how to host a wcf service using the wsHttpBinding. When you use http, you would normally host it in IIS, but if you would like to host it in a console application, you could follow this article. Here we will try to host a service with a wsHttpBinding and will expose a MEX endpoint in order to expose the metadata so that any tool which can generate a proxy can use it. Here in this example we are exposing the MEX endpoint particularly to be used in the WCF test client. This article will not cover how you can generate a wcf service. If you like to know how a basic service is created, you need to read [Article] Creating WCF Service and Self Hosting in a console application.

How to edit wcf configuration.

All your wcf configuration will be stored in the app.conf file of your host project. Here in our case as we are going to host it in a console application, it will be the app.conf of the console application. You could use the wcf configuration edit tool to edit this configuration. To open the wcf configuration tool, do as shown in the image.


Adding an endpoint with wsHttpBinding

Here we need to add an wshttp endpoint. Create your endpoint as shown in the image below.


Here in the address field, give the name of the interface where you have defined a service contract. Here the address name could be anything but we will keep it as the name of the interface, this is the relative address which we are defining; we will later add a base address for this. Add wsHttpBinding on to the binding column. Here we defined wsHttp as the binding for this endpoint. To the contract field, browse to the dll where we have the interface on which we have defined the service contract. You could point to the dll where we have this interface. 

Adding a base address for the endpoint.

Now we need to add a base address to the service, So that the complete address for the service will look like “Base Adress + Name of the service” Add it as shown in the image. Here the port number can be any port number except the reserved and already used.


With this, we are done creating a basic endpoint.

Adding MEX Endpoint.

Now create a wsHttp MEX endpoint as shown in the image. Here IMetadataExchange is the default contract implementation from Microsoft. We will just add this text as the contract implementation of MEX. 


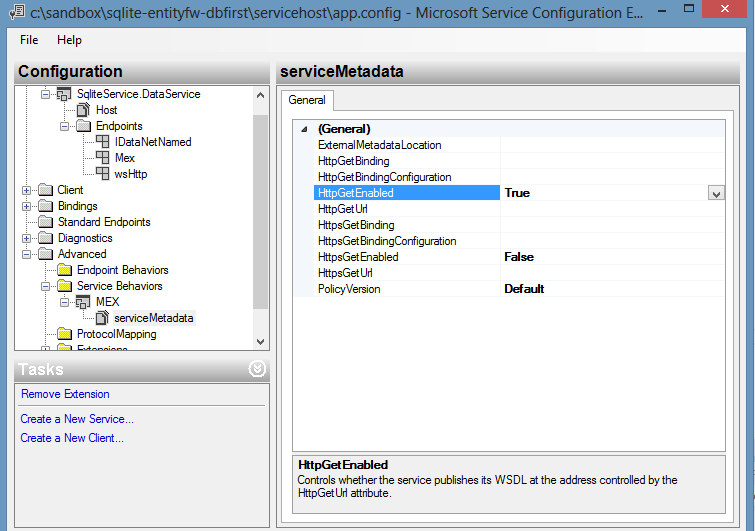
Now this is a MEX end point exposed via http, so we need to enable some more setting for this MEX end point to work. Go to advanced->Service Behavior->MEX and set HttpGetEnabled to true as shown in the image below.


Adding Mex behaviour to the service.

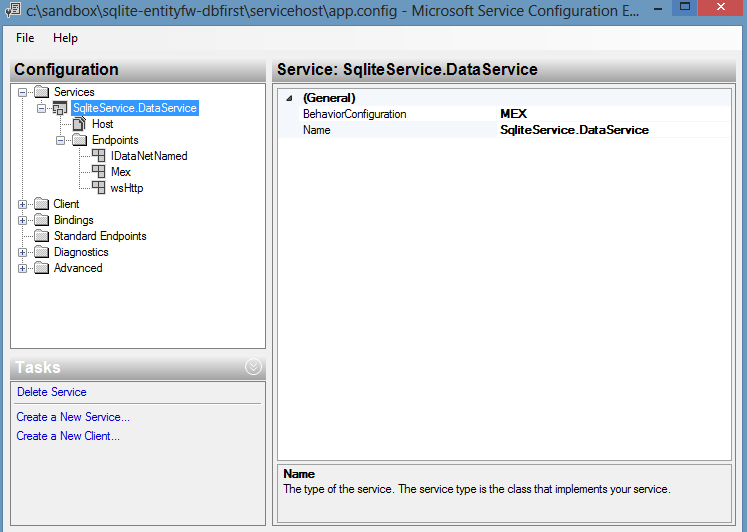
Now we need to enable MEX behaviour to the service. Do as shown in the image. Select MEX from the dropdown for BehaviorConfiguration. Remember, MEX is the name given to the Mex endpoint.


Now we are ready, now remember to run the service host as Admin, because when we have http endpoint, it requires this or else it will throw an access violation exception. Now open the WCF test client and add the service endpoint to test it.


Tuesday, 6 October 2015

Introduction

    There are scenarios where we have to show a standalone message box even before the application main window is launched. In such scenario, we need to do something different. Say if we have a composite application with a bootstrapper, and we want to show some error while running a bootstrapper, it may look difficult because we don’t have a parent window. In such scenario, we can show the message box as shown below.

private static void ShowError(string message)
        {
            
/* We cannot show a message out in void. So we are creating a dummy window and setting visibility as hidden. we will then use this as the parent of the message box. */

            var w = new Window() { Height = 0, Width = 0, Visibility = Visibility.Hidden, WindowStyle = WindowStyle.None };

            w.Show();
            System.Windows.MessageBox.Show(w, message);
            w.Close();
        }

Here we will create and show a window where the visibility of the window is set to hidden, now we will use this window as the parent of the message box and will show the message box.

Wednesday, 30 September 2015

Introduction

      This post is a continuation of [Article] WPF Wizard control with MVVM support. Here I am trying to address some of the concerns people have regarding wizard control. This include
1. How to share/collect data from each view.
2. How to control the navigation or how to validate before navigation.

To know more on the basics, please refer to the parent article. Here I have modified the wizard control files. The wizard comes with three files.

This control comes in three files.

1. Wizard.cs
2. WizardItemHeader.cs
3. IWizardItem.cs

You can download this control from Github page. Contribution to this control will be appreciated.


public interface IWizardItem
    {
        /// <summary>
        /// This method should return the header for wizard item to display
        /// </summary>
        /// <returns> A string value.</returns>
        string GetHeader();

        /// <summary>
        /// This method will be the first to get invoked even before the OnViewActivated call. This method will pass a shard object to views in wizard where they can collect the shared object.
        /// </summary>
        /// <param name="sharedObject">
        /// This is the shared object. This will contain information from other views in the wizard.
        /// </param>

        void CollectSharedObject(object sharedObject);

        /// <summary>
        /// This method will be invoked to check whether this item can be displayed or not.
        /// </summary>
        /// <returns>A boolean value indicating true or false status</returns>

        bool CanDisplay();

        /// <summary>
        /// This method will get invoked when the wizard item becomes the active item.
        /// </summary>
        /// <param name="autoAcknoledgeNext">
        /// The auto Acknoledge Next. Setting this to true will help wizard skip this view and take you to the next page automatically.
        /// </param>

        void OnWizardItemNavigatedTo(ref bool autoAcknoledgeNext);

        /// <summary>
        /// This method will get invoked on the current wizard item when the control is moved to next wizard item.
        /// </summary>
        /// <param name="canNavigateAway">
        /// The can Navigate Away. This value when set to false, will not allow navigation from this view. You can use this to do some validation before you navigate to next view.
        /// </param>

        void OnWizardItemNavigatedFrom(ref bool canNavigateAway);
    }

IWizardItem is the interface which you need to implement on the viewmodel for the view which you will show in the wizard. Here wizard also exposes a property called “SharedObject” this can be of any type which. The wizard will then pass it to the viewmodel of the view currently displayed. So the viewmodel can collect it and save data on to this and can be used at later stage.

Now you can use this wizard in wpf as shown below.
<wizardView:Wizard CancelCommand="{Binding CancelCommand}"
      OkCommand="{Binding OkCommand}"
      SharedObject="{Binding SharedObject}"       
      Orientation="Top"
      FinalButtonText="Done"
      WizardItems="{Binding WizardItems}" />

You can download the sample code from Here.


Tuesday, 22 September 2015

Introduction

 In this article we will see how to call a WCF service without adding a service reference. In this article we will see two ways of calling WCF service method. One is to call the WCF service method on the fly and second is by creating a custom proxy without the help of SvcUtil or any other tool. We will be using a two way service in this article.

Introduction

 There are cases when an operation has no return value, and the client does not care about the success or failure of the invocation. To support this sort of fire and forget invocation, WCF offers one-way operations. In this article we will see how to create a one way service which responds to client via callback.

Monday, 8 June 2015

Introduction

         In this article we will see how we can cancel a running task. Task class in .net library is extremely useful when you want to handle thread. Developers don’t have to create or maintain thread explicitly. Methods executed by a Task typically execute asynchronously and it uses background threads from the thread pool. There is no direct way of cancelling a task. .Net framework provides CancellationToken  which we can use to cancel a task with limitation. We will first look at how to cancel a task with cancellation token and later we will see in which all scenario this doesn't work and we will also see the workaround for this.

Cancelling a task using CancellationToken

You can register an action to execute when a cancel is invoked on a cancellation token, To cancel a task we have to hook the thread on which the task executes the method and we have to call abort on that thread to stop the thread and there by cancelling the task as shown below.
int DoWork(CancellationToken token)
{
  Thread t = Thread.CurrentThread;
  using (token.Register(t.Abort))
  {
    // CPU-bound work here
  }
}

You can find the complete code below. Here we have a generic method called ExecuteAsync which can execute any given method. Here TReturn is the type which we return from the method which we want to execute.

namespace ConsoleApplicationTest
{
    using System;
    using System.Threading;
    using System.Threading.Tasks;

    public class AsyncTaskResult<TResult>
    {
        public TResult Result { get; set; }

        public Exception Exception { get; set; }
    }

    class Program
    {
        static void Main(string[] args)
        {
            Console.WriteLine("Press any key to proceed!");
            Console.ReadLine();

            var canceller = new CancellationTokenSource();
            Action<AsyncTaskResult<bool>> act = (o) =>
            {
                // you will get the result as a callback here.
                bool result = o.Result;
                Exception exception = o.Exception;
            };
            ExecuteAsync(DoWork, act, canceller, null);
            Thread.Sleep(2000); // cancel the task after 2 seconds.
            canceller.Cancel();

            Console.WriteLine("Press any key Exit!");
            Console.ReadLine();
        }

        private static bool DoWork(object parameter)
        {
            try
            {
                // make it sleep for 60 seconds.
                Thread.Sleep(1000 * 60);
            }
            catch (ThreadAbortException ex)
            {
                /* Do all the cleanup required. 
                 This is very important as this is the only chance to cleanup resources used by the task.
                 */
            }

            return true;
        }

        private static void ExecuteAsync<TReturn>(Func<object, TReturn> action, Action<AsyncTaskResult<TReturn>> callback, CancellationTokenSource canceller, object parameter)
        {
            Exception thrownException = null;
            TReturn returnValue = default(TReturn);

            Func<object, TReturn> work = o =>
            {
                Thread currentThread = Thread.CurrentThread;

                /* register abort as the action for cancellation tocken. This method will be invoked when we call cancell on cancellation tocken */
                using (canceller.Token.Register(
                    () =>
                    {
                        try
                        {
                            currentThread.Abort();
                        }
                        catch (Exception)
                        {
                            // silence it. Cancelable operations and callbacks registered with the token should not throw exceptions.
                        }
                    }))
                {
                    return action(parameter);
                }
            };

            Task<TReturn> startNew = Task.Factory.StartNew(work, null, canceller.Token);

            startNew.ContinueWith(
                t =>
                {
                    try
                    {
                        AggregateException aggregateException = t.Exception;
                        if (aggregateException != null)
                        {
                            if (null != aggregateException.InnerException)
                            {
                                thrownException = aggregateException.InnerException;
                            }
                            else
                            {
                                thrownException = aggregateException;
                            }
                        }
                        else
                        {
                            returnValue = t.Result;
                        }
                    }
                    catch (Exception)
                    {
                        // silence it.
                    }
                    finally
                    {
                        var ret = new AsyncTaskResult<TReturn>
                        {
                            Result = returnValue,
                            Exception = thrownException
                        };

                        callback.Invoke(ret);
                    }
                });
        }
    }
}

Problem using this way of cancelling a task.

  1. Calling an abort on a thread will not guarantee an abort. If there is any blocking call, say for example, if the method is waiting for a call-back from a socket communication, then calling an abort on that thread won’t stop the thread from execution. So even if you try to call a cancel on a cancellation token, it will have no effect on the thread.
  2. Aborting a thread is not a recommended way of stopping a thread. It will leave the app domain in an unsafe state.

How to cancel a blocking task?

We will have to rely on abort in this situation as-well but in a different way. Here, to achieve this, we will have to deploy another task! This sounds like a weird way of solving this? We don’t want a failing cancel call!. Here we will deploy another task and the abort will be called on that. The complete code on how to cancel a blocking task can be found below.

namespace ConsoleApplicationTest
{
    using System;
    using System.Runtime.CompilerServices;
    using System.Threading;
    using System.Threading.Tasks;

    /// <summary>
    /// Wrapper class which is used to wrap the result and exception from the task.
    /// </summary>
    /// <typeparam name="TResult"></typeparam>
    public class AsyncTaskResult<TResult>
    {
        public TResult Result { get; set; }

        public Exception Exception { get; set; }
    }

    class Program
    {
        static void Main(string[] args)
        {
            Console.WriteLine("Press any key to proceed!");
            Console.ReadLine();

            var canceller = new CancellationTokenSource();
            Action<AsyncTaskResult<bool>> act = (o) =>
            {
                // you will get the result as a callback here.
                bool result = o.Result;
                Exception exception = o.Exception;
            };
            ExecuteAsync(DoWork, act, canceller, null);
            Thread.Sleep(2000); // cancel the task after 2 seconds.
            canceller.Cancel();

            Console.WriteLine("Press any key Exit!");
            Console.ReadLine();
        }

        private static bool DoWork(object parameter)
        {
            try
            {
                // make it sleep for 60 seconds.
                Thread.Sleep(1000 * 60);
            }
            catch (ThreadAbortException ex)
            {
                /* Do all the cleanup required. 
                 This is very important as this is the only chance to cleanup resources used by the task.
                 */
            }

            return true;
        }

        private static void ExecuteAsync<TReturn>(
            Func<object, TReturn> action,
            Action<AsyncTaskResult<TReturn>> callback,
            CancellationTokenSource canceller,
            object parameter)
        {
            Exception thrownException = null;
            TReturn returnValue = default(TReturn);

            Func<object, TReturn> work = o =>
            {
                bool cancelled = false;

                using (canceller.Token.Register(
                    () =>
                    {
                        // just mark cancelled as true when cancel is invoked on this task.
                        cancelled = true;
                    }))
                {
                    Func<object, TReturn> subWork = op =>
                    {
                        Thread currentThread = Thread.CurrentThread;
                        using (canceller.Token.Register(
                            () =>
                            {
                                try
                                {
                                    // mark abort as the action to execute when cancel is invoked for this task.
                                    currentThread.Abort();
                                }
                                catch (Exception)
                                {
                                    /* silence it. Cancelable operations and callbacks registered with the token should not throw exceptions.*/
                                }
                            }))
                        {
                            return action(parameter);
                        }
                    };

                    Task<TReturn> task = Task.Factory.StartNew(subWork, null, canceller.Token);
                    while (!task.IsCompleted && !cancelled)
                    {
                        /* we will wait for half a second to poll again. We could also reduce this timeout.*/
                        Thread.Sleep(500);
                    }

                    if (cancelled)
                    {
                        /* As we are releasing the thread to kill itself, we have to raise a thread abort exception explicitly.*/
                        throw new TaskCanceledException();
                    }

                    if (task.Exception != null)
                    {
                        /* throw the exception if any while executing the sub task.
                             * Task exception will be aggregate exception, we are here interested in the real exception, so pass the inner exception. 
                             * ExceptionDispatchInfo is a feature in .net 4.5. This lets you capture an exception and re-throw it without changing the stack-trace:
                            */
                            ExceptionDispatchInfo.Capture(task.Exception.InnerException).Throw();
                    }

                    // return the result if the task executed successfully.
                    return task.Result;
                }
            };

            Task<TReturn> startNew = Task.Factory.StartNew(work, null, canceller.Token);

            startNew.ContinueWith(
                t =>
                {
                    try
                    {
                        AggregateException aggregateException = t.Exception;
                        if (aggregateException != null)
                        {
                            // grab the exception thrown by the task if any.
                            if (null != aggregateException.InnerException)
                            {
//ExceptionDispatchInfo will help you capture the exception stack.
thrownException = ExceptionDispatchInfo.Capture(aggregateException.InnerException).SourceException;
                            }
                            else
                            {
                                thrownException = aggregateException;
                            }
                        }
                        else
                        {
                            returnValue = t.Result;
                        }
                    }
                    catch (Exception)
                    {
                        // silence it.
                    }
                    finally
                    {
                        /*wrap the exception and result into a single object to pass it back to caller.*/
                        var ret = new AsyncTaskResult<TReturn> { Result = returnValue, Exception = thrownException };

                        callback.Invoke(ret);
                    }
                });
        }
    }
}