Showing posts with label WCF. Show all posts

Wednesday, 14 December 2016

Introduction

   I started on this issue when I had my WCF service times out when I am trying a normal socket connection. This was running fine in windows 8. We had a keep-alive WCF call which tells the server that the client is still active. For this we need the port sharing to be enabled on the machine. I was on an impression that the port sharing was not working and because of which it fails. From the log I came to a conclusion that the keep alive was failing so this made me doubt the TCP port sharing. But I could also see that when I install visual studio, then the application works. This made me doubt the .net framework. Finally I detected the slow network. This was the real culprit.

Windows 10 comes with a real time protection which scans each packets received across TCP. This slows down the network. The fix for this is to disable the real time protection.

On the windows settings you can find windows defender. You can switch off real-time protection.

But nothing is intended for bad purpose. So let’s not disable it. We have an option of setting the exclusion list. We have to use that to ignore known applications from this real time scanning. This was we can bring the application back to normal.


Tuesday, 20 October 2015

Introduction

    Starting with IIS 7, we can have IIS hosting application which can run on separate App-domain. Running application on separate App-domain is required when we need application to work in isolation i.e. to prevent applications in one application pool from affecting applications in another application pool on the server. An application can have several virtual directories, and each one will be served by the same App-domain as the application to which they belong. In most of the cases it should be fine to run an application in the default app-domain created by IIS. But on special scenarios say for example, if you want your application to be served by a different version of the run-time, then you can create an app-domain by specifying the run-time version and can use that to serve the application. Or if you want your applications to work in complete isolation then also you can do the same. Here in this post we will see how to host multiple WCF service under one website where each service is running in isolation with each on separate app-domain.

Hosting WCF service using separate app-domain.

  An application is an object important to the server at run-time. Every website object in IIS must have an application and every application must have at least one virtual directory where each virtual directory points to a physical directory path. When you create a website object in IIS, you are creating a default application. An application can have several virtual directories. To know how you can host a WCF service in default application in IIS, you can refer to the article [Article] How to host a WCF service in IIS 8. Let us now examine how we have created a website object with default application.


  Here in the IIS, in connections section, on Sites, when we right click and say “Add website” it opens up a website object(default application) creation wizard like as shown in the image above. Here “Site name” refers to the name of the site(application) which you want. “Physical directory” should point to the root directory of the website. Just for the demo purpose we will point the physical directory to an empty folder. It could also be a root folder of one WCF service where you have the .svc file. And in the section where it is asking for the “Application pool” is where we have to select the application pool or so called app-domain. Here at the moment we only have a default app domain so we will leave it as is. And if you say ok, then the website object is ready. Now what we have done here is we have created a website object, we have created a default application, we have created a virtual directory which will point to the physical directory as specified in “Physical directory” and the default application will now run in an app domain specified by us in the “Application pool” section. Now we will see how we can create another app-domain.

Creating Application Pool(App-domain)

In IIS, on the connection section, if you expand the server node, you can see “Application Pool” node. On the “Application Pools” node if you right-click and say “Add Application Pool” it will open up a window as shown below. Give a name for your new app-domain, this could be any unique name. and select the version of run-time which you like the application to run with and say Ok. Now your new app-domain is ready to use. 


Adding new application object

  Now on to the website object which we just created, right click and say Add Application, it opens up a wizard to create an application object under the website object. Now in this wizard, Alias is the name which we are going to give to the application and this name is also going to be the part of the url of the application so give it a proper name. The Physical Path is where your root folder for your wcf service where you have the .svc file. Now the Application pool section is where you can select your App-domain which you created just before.


Now when you browse the .svc file from the application folder, IIS will then use the App-domain which you have assigned for the application to serve the request. In this way you can create more app domain and more WCF services which will then work in isolation.


Saturday, 17 October 2015

 Introduction

  Here in this article we will see how to configure and host a WCF service in IIS 8. When we want to expose our service to internet, hosting it in IIS is the easy and effective way to do it. When you host it in IIS, it comes with all the added advantage of the web server. If you don’t want to host in IIS, you could still do that with a console application running in a server machine. To know more on hosting a service in console application and exposing an http endpoint, you can refer to [Article] How to host a WCF service in console application using wsHttp binding. The entire configuration which you will see in this article will be for Windows 8 and Visual studio 2012.

  1. Configure IIS
  2. Create a WCF service.
  3. Hosting in IIS

1. Configure IIS

  • Enable IIS – Internet information service (IIS) will be disabled by default in windows 8. We need to enable this as a first step in hosting wcf. To do this you have to go to Control Panel -> Programs and Features and select Turn windows features on or off from the left side menu and enable IIS.


  • Enable Asp.Net – The runtime which is going to serve your wcf service when you host it in IIS is the ASP.Net. By default this is disabled in IIS, we have to enable this. Without ASP.Net IIS will not be able to serve your WCF service. To enable ASP.Net you have to go to Control Panel -> Programs and Features and select Turn windows features on or off and under Internet Information Service->World Wide Web service->Application Development Features select the ASP.Net version which you want.


  • Enable WCF and its HTTP endpoint feature – We have to enable WCF and the WCF HTTP Activation feature in IIS. Without this IIS won’t be able to recognize the WCF service and it won’t be able to serve it. To enable this, go to Control Panel -> Programs and Features and select Turn windows features on or off and select .Net Framework 4.5 Advanced Services and enable WCF Services and HTTP Activation under WCF.


With this our basic features in IIS to host a WCF service is enabled. Now restart IIS and we should be able to host the WCF service.

2. Create a WCF service

  Here to test hosting a WCF service, we will create simple WCF service. We will then host this WCF service to see it in action in IIS. To begin with, let’s create a service. Create a folder called Host_wcf. Inside this folder create another folder and name it as App_Code. To this folder, create a file called DataService.cs and copy paste the service code as given below.

using System;
using System.Collections.Generic;
using System.Linq;
using System.Text;
using System.Threading.Tasks;
namespace SqliteService
{
    using System.ServiceModel;
    [ServiceContract()]
    public interface IDataService
    {
        [OperationContract()]
        void AddCustomer();

        [OperationContract()]
        void AddProduct();
    }

    public class DataService : IDataService
    {
        public void AddCustomer()
        {
        }

        public void AddProduct()
        {
            throw new NotImplementedException();
        }
    }
}


Now create a file called services.svc in the root folder, i.e. to Host_wcf and add the below line of code into it.
<%@ServiceHost language=c# Debug="true" Service="SqliteService.DataService" CodeBehind="~/App_Code/DataService.cs" %>

Here CodeBehind points to the file where we have the service implementation. Now we need a Web.config file in the root folder i.e. at Host_wcf folder. Copy paste the below line of code into it. Here the configuration is a prebuild configuration, to know more on how to create this end point, go to [Article] How to host a WCF service in console application using wsHttp binding.

<?xml version="1.0" encoding="utf-8" ?>
<configuration>
  <system.serviceModel>
    <behaviors>
      <serviceBehaviors>
        <behavior name="MEX">
          <serviceMetadata httpGetEnabled="true" httpsGetEnabled="false" />
        </behavior>
      </serviceBehaviors>
    </behaviors>   
    <services>
      <service behaviorConfiguration="MEX" name="SqliteService.DataService">
        <endpoint address="Mex" binding="wsHttpBinding" bindingConfiguration=""
          name="Mex" contract="IMetadataExchange" kind="" endpointConfiguration="" />
        <endpoint address="IDataService" binding="wsHttpBinding" bindingConfiguration=""
          name="wsHttp" contract="SqliteService.IDataService" />
        <host>
          <baseAddresses>
            <add baseAddress="http://localhost:80" />
          </baseAddresses>
        </host>
      </service>
    </services>
  </system.serviceModel>
</configuration>

Now we need to set the permission for the root folder so that IIS can access content from this folder. Go to security settings of the root folder and give read and execute permission for “Everyone”. With this, we are ready with the service. When you host a service in IIS, it is the ASP.Net runtime which compiles the code behind and serve the service. So make sure that it is error free and it can compile properly. Alternatively you can create a WCF project using “WCF Service Application” project template in visual studio and compile the code to make sure that it can compile properly.


3. Hosting in IIS

Now we will see how we can host a service in IIS. Let us launch IIS. To do this type “inetmgr” in Run, it will open up the Internet Information Service (IIS) Manager. Now expand the server from left hand side under Connection section. Now expand Sites. Here we will have a default website running, the default website will be using port no 80. We are also going to host the service on port 80 which is the default http port. We cannot have two websites using same port. So we will stop the default website for time being. To do this, right click on the Default Web Site and from Manage WebSite say stop. Now right click on the Sites and say Add Website and fill in the details as shown in the image below. We can also host our service as an application under the default website but let’s do it this way.


Now here the physical path is the path to our root directory which we created to hold the wcf service files. Say OK and your service should be ready to use now. Now to confirm this, we will browse the .svc file in our service.


If everything is fine, it should pop up a page which looks something like as shown in the image below.


Monday, 12 October 2015

Introduction

    In this article we will see how to host a wcf service using the wsHttpBinding. When you use http, you would normally host it in IIS, but if you would like to host it in a console application, you could follow this article. Here we will try to host a service with a wsHttpBinding and will expose a MEX endpoint in order to expose the metadata so that any tool which can generate a proxy can use it. Here in this example we are exposing the MEX endpoint particularly to be used in the WCF test client. This article will not cover how you can generate a wcf service. If you like to know how a basic service is created, you need to read [Article] Creating WCF Service and Self Hosting in a console application.

How to edit wcf configuration.

All your wcf configuration will be stored in the app.conf file of your host project. Here in our case as we are going to host it in a console application, it will be the app.conf of the console application. You could use the wcf configuration edit tool to edit this configuration. To open the wcf configuration tool, do as shown in the image.


Adding an endpoint with wsHttpBinding

Here we need to add an wshttp endpoint. Create your endpoint as shown in the image below.


Here in the address field, give the name of the interface where you have defined a service contract. Here the address name could be anything but we will keep it as the name of the interface, this is the relative address which we are defining; we will later add a base address for this. Add wsHttpBinding on to the binding column. Here we defined wsHttp as the binding for this endpoint. To the contract field, browse to the dll where we have the interface on which we have defined the service contract. You could point to the dll where we have this interface. 

Adding a base address for the endpoint.

Now we need to add a base address to the service, So that the complete address for the service will look like “Base Adress + Name of the service” Add it as shown in the image. Here the port number can be any port number except the reserved and already used.


With this, we are done creating a basic endpoint.

Adding MEX Endpoint.

Now create a wsHttp MEX endpoint as shown in the image. Here IMetadataExchange is the default contract implementation from Microsoft. We will just add this text as the contract implementation of MEX. 


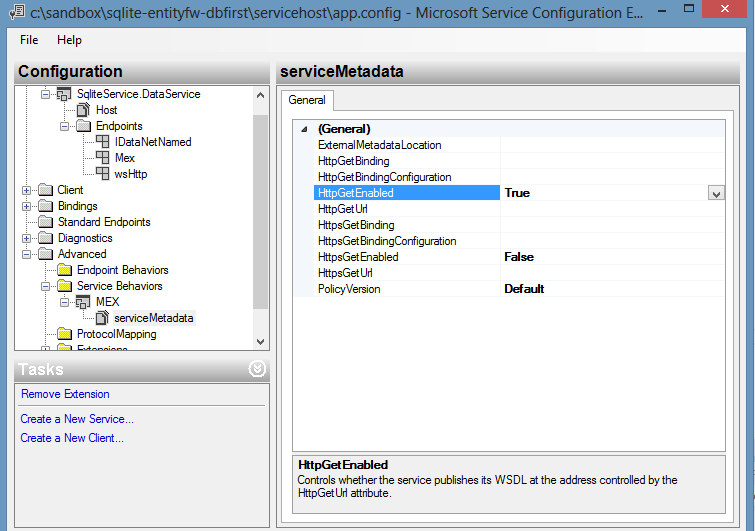
Now this is a MEX end point exposed via http, so we need to enable some more setting for this MEX end point to work. Go to advanced->Service Behavior->MEX and set HttpGetEnabled to true as shown in the image below.


Adding Mex behaviour to the service.

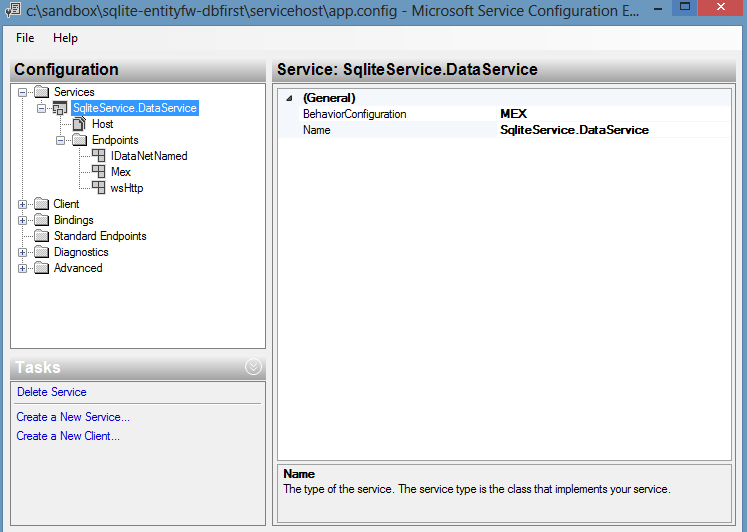
Now we need to enable MEX behaviour to the service. Do as shown in the image. Select MEX from the dropdown for BehaviorConfiguration. Remember, MEX is the name given to the Mex endpoint.


Now we are ready, now remember to run the service host as Admin, because when we have http endpoint, it requires this or else it will throw an access violation exception. Now open the WCF test client and add the service endpoint to test it.


Tuesday, 22 September 2015

Introduction

 In this article we will see how to call a WCF service without adding a service reference. In this article we will see two ways of calling WCF service method. One is to call the WCF service method on the fly and second is by creating a custom proxy without the help of SvcUtil or any other tool. We will be using a two way service in this article.

Introduction

 There are cases when an operation has no return value, and the client does not care about the success or failure of the invocation. To support this sort of fire and forget invocation, WCF offers one-way operations. In this article we will see how to create a one way service which responds to client via callback.

Sunday, 7 June 2015


Introduction

While I was working with WCF service application, I came across a situation where I am hosting my WCF service in a console application and I don't want the console application to show up when my service is up. I fixed it this by Pinvoke a call to FindWindow() to get a handle to your window and then call ShowWindow() to hide the window. I have created a sample code to show how I did this. It is as given below.

using System;
using System.Runtime.InteropServices;
using System.Threading;
namespace TestShowHideConsole
{
    internal class Program
    {
        [DllImport("user32.dll")]
        public static extern IntPtr FindWindow(string lpClassName, string lpWindowName);

        [DllImport("user32.dll")]
        private static extern bool ShowWindow(IntPtr hWnd, int nCmdShow);

        private static void Main(string[] args)
        {
            string consoleWindowTitle = Console.Title;
            IntPtr hWnd = FindWindow(null, consoleWindowTitle);
            if (hWnd != IntPtr.Zero)
            {
                ShowWindow(hWnd, 0); /* 0 = SW_HIDE */
            }
            Thread.Sleep(1000*10);/* will show your console after 10 second */
            if (hWnd != IntPtr.Zero)
            {
                ShowWindow(hWnd, 1); /*1 = SW_SHOWNORMA */
            }
            ConsoleKeyInfo consoleKeyInfo = Console.ReadKey();/* this will make the window wait till some key is pressed.*/
        }
    }
}

Here in this example, this will open up a console and it will be hidden for 10 seconds and will come up after that.

How to hide a console application If it is running from another application.

If you are running the console application from another application and you want to hide the console window, then you can do like this. This will start your console application but the window will be hidden. You can see your application still running from the task manager. If you cant find your application running in the task manager, then some error is there in your application and you may need to debug it

Process p = new Process
        {
          StartInfo =  {
                       FileName = YourConsoleaApplicationFileHere,
                       Arguments = "Argument to console application if                     any.",
                       WindowStyle = ProcessWindowStyle.Hidden
/*Or you can use CreateNoWindow = true instead of WindowStyle*/
                       }
         };
p.Start();


ContractFilter mismatch at the EndpointDispatcher

A "ContractFilter mismatch at the EndpointDispatcher" can happen because the client could not process the message because no contract claimed it. This can happen because of the following reasons:

  1. Your client and the service have different contracts in between.
  2. Your client and service is using a different binding in between.
  3. Your client's and service's message security settings are not consistent in between.

Most of ContractFilter mismatch at the EndpointDispatcher bugs are because you use custom binding and your binding has extra tag which is missing either at client or service side. Have a close look at your binding, verify that it is same at both client and server side. The tags has to be same at client and server side, attribute value such as timeouts can vary at client and server. This is common and will not create issue. But if you have a tag say <ReliableSession /> at client side and is missing at server side, 'http://schemas.xmlsoap.org/ws/2005/02/rm/CreateSequence' cannot be processed at the receiver, due to a ContractFilter mismatch at the EndpointDispatcher can happen.


Introduction

This post is for those who are working with WCF and at times sulking because of errors which does not show up and who spends lots of time debugging what is going wrong with their service and client.

I was working with a WCF service and I came across a situation where my client application is trying to connect to service via proxy and client is waiting for the call to return and it never returns finally it times out. I was not having any clue what was happening. I had application level tracing which was not able to track anything. Finally I decided to  enable WCF built in tracing!.

How to enable WCF Trace listener

By default Windows Communication Foundation (WCF) does not log messages. To enable message logging, you must add a trace listener to the System.ServiceModel.MessageLogging trace source and set attributes for the <messagelogging> element in the configuration file. Lets see how to enable WCF logging.  You can use WCF provided Configuration Editor Tool (SvcConfigEditor.exe) to configure these settings..

Basic Setting

<system.diagnostics>
  <sources>
      <source name="System.ServiceModel.MessageLogging">
        <listeners>
                 <add name="messages"
                 type="System.Diagnostics.XmlWriterTraceListener"
                 initializeData="c:\logs\messages.svclog" />
          </listeners>
      </source>
    </sources>
</system.diagnostics>

<system.serviceModel>
  <diagnostics>
    <messageLogging 
         logEntireMessage="true" 
         logMalformedMessages="false"
         logMessagesAtServiceLevel="true" 
         logMessagesAtTransportLevel="false"
         maxMessagesToLog="3000"
         maxSizeOfMessageToLog="2000"/>
  </diagnostics>
</system.serviceModel>


  1. maxSizeOfMessageToLog is the message size in memory . This size can differ from the actual length of the message string that is being logged, and in many occasions is bigger than the actual size. As a result, messages may not be logged. So consider this situation and set the value of maxSizeOfMessageToLog appropriately.
  2. logMessagesAtServiceLevel This boolean value is for logging messages at service level. Messages logged at this layer are about to enter (on receiving) or leave (on sending) user code. By default all messages at the service level are logged. Infrastructure messages (transactions, peer channel, and security) are also logged at this level, except for Reliable Messaging messages. On streamed messages, only the headers are logged. In addition, secure messages are logged decrypted at this level.
  3. logMessagesAtTransportLevel This boolean value is for logging messages at transport level. Messages logged at this layer are ready to be encoded or decoded for or after transportation on the wire. By default all messages at the transport layer are logged. All infrastructure messages are logged at this layer, including reliable messaging messages. On streamed messages, only the headers are logged. In addition, secure messages are logged as encrypted at this level, except if a secure transport such as HTTPS is used.


Where to apply the log

You can apply the configuration on both service side and client side configuration file. You can analyse the log file which will be created after you run the service. Here if you are using the trace listener as-is then it will create a log file at "c:\logs\messages.svclog". you can change the file location as you like.

Recommended Setting for debugging 


When you are using logging in  debugging environment , and you are using WCF trace sources, set the switchValue to Information or Verbose, along with ActivityTracing. To enhance debugging, you should also add an additional trace source (System.ServiceModel.MessageLogging) to the configuration to enable message logging. Notice that the switchValue attribute has no impact on this trace source.
You can set the switchValue attribute to Information in all the previously mentioned cases, When you set the switchValue attribute to Information, it will log all messages. A recommended configuration is as shown below.

 <configuration>
 <system.diagnostics>
  <sources>
    <source name="System.ServiceModel" switchValue="Information,
 ActivityTracing"
            propagateActivity="true" >
      <listeners>
        <add name="xml"/>
      </listeners>
    </source>
    <source name="System.ServiceModel.MessageLogging">
      <listeners>
        <add name="xml"/>
      </listeners>
    </source>
    <source name="myUserTraceSource" switchValue="Information, ActivityTracing">
      <listeners>
        <add name="xml"/>
      </listeners>
    </source>
  </sources>
  <sharedListeners>
    <add name="xml"
         type="System.Diagnostics.XmlWriterTraceListener"
               initializeData="C:\logs\Traces.svclog" />
  </sharedListeners>
 </system.diagnostics>

 <system.serviceModel>
  <diagnostics wmiProviderEnabled="true">
      <messageLogging 
           logEntireMessage="true" 
           logMalformedMessages="true"
           logMessagesAtServiceLevel="true" 
           logMessagesAtTransportLevel="true"
           maxMessagesToLog="3000" 
       />
  </diagnostics>
 </system.serviceModel>
</configuration>

Recommended setting for Production environment 


When you are using logging in production environment, and you are using WCF trace sources, set the switchValue to Warning. If you are using the WCF System.ServiceModel trace source, set the switchValue attribute to Warning and the propagateActivity attribute to true. If you are using a user-defined trace source, set the switchValue attribute to Warning, ActivityTracing. If you do not fell like there will be any performance hit, you can set the switchValue attribute to Information in all the previously mentioned cases, When you set the switchValue attribute to Information, it will log all messages which will be a fairly large amount of data and this is why it should be avoided if you feel it will cause you performance hit. A recommended configuration is as shown below.

<configuration>
 <system.diagnostics>
  <sources>
    <source name="System.ServiceModel" switchValue="Warning"
            propagateActivity="true" >
      <listeners>
        <add name="xml"/>
      </listeners>
    </source>
    <source name="myUserTraceSource"
            switchValue="Warning, ActivityTracing">
      <listeners>
        <add name="xml"/>
      </listeners>
    </source>
  </sources>
  <sharedListeners>
    <add name="xml"
         type="System.Diagnostics.XmlWriterTraceListener"
               initializeData="C:\logs\Traces.svclog" />
  </sharedListeners>
 </system.diagnostics>

<system.serviceModel>
  <diagnostics wmiProviderEnabled="true">
  </diagnostics>
 </system.serviceModel>
</configuration>

After enabling WCF level logging you will come to know what is wrong in your system. When you have the type of exception that you have, its much simpler to fix it. :)


Introduction

  This fix explained here is helpful if you are using WCF and when you try to access the service, the client throws an exception like "An endpoint configuration section for contract ‘YourContract' could not be loaded because more than one endpoint configuration for that contract was found. Please indicate the preferred endpoint configuration section by name".

How to fix this exception 

  WCF service can expose more than one endpoint and client can use any of this endpoint but not more than one at a time. This type of exception occurs when you have more than one endpoint configured at your configuration file (app.config) file while adding service reference or while configuring service at client side manually. You can have only one and only endpoint for the client. If you are getting this exception then check your client side configuration file and make sure the client tag under system.serviceModel has only one endpoint configured.

<system.serviceModel>
   <client>
      <endpoint [...]>
     </endpoint>
   </client>
</system.serviceModel>

Wednesday, 23 July 2014

Introduction

Service has zero application (non-infrastructure) endpoints. This might be because no configuration file was found for your application, or because no service element matching the service name could be found in the configuration file, or because no endpoints were defined in the service element. This can happen if there is no proper endpoint configured for the service.
Introduction

Here we will see how to fix the exception, the .Net Framing mode being used is not supported by 'net.tcp://....' See the server logs for more details.

Introduction

If you are using netNamedPipeBinding for your communication then you may get an exception like
“There was an error reading from the pipe: Unrecognized error 109 (0x6d).”
Introduction

This fix is helpful if you are using WCF streaming and you got this exception while transferring huge file using data contract. If you are using streaming and the stream is transferred to or from WCF service, then you will get an exception like
“There was an error while trying to serialize parameter http://tempuri.org/:fileStream. The InnerException message was 'Type 'System.IO.FileStream' with data contract name 'FileStream: http://schemas.datacontract.org/2004/07/System.IO' is not expected. Consider using a DataContractResolver or add any types not known statically to the list of known types - for example, by using the KnownTypeAttribute attribute or by adding them to the list of known types passed to DataContractSerializer.'.  Please see InnerException for more details.”
Introduction

 In this article we will see how to transfer a huge file to and from WCF services efficiently. WCF supports streaming of data. We will use streaming to transfer huge file efficiently to and from a WCF service. This article is all about transferring file using streaming transfer mode in WCF and it does not enforce you to use streaming always, because of its limitations.
Introduction

 In this article, we will see how to create a simple WCF service. Then we will see how to host this WCF service in a console application with so called self-hosting. After that we will see how to expose service metadata via MEX endpoint. After that we will see how to create a proxy for the WCF service which has net.tcp and net.pipe endpoints using visual studio 2010.